Best Garage Organization Products for Beginners (6-Piece Starter Kit)
Disclosure: This article contains affiliate links. If you buy through these links, we may earn a commission at no extra cost to you. We do not claim hands-on testing unless clearly stated.
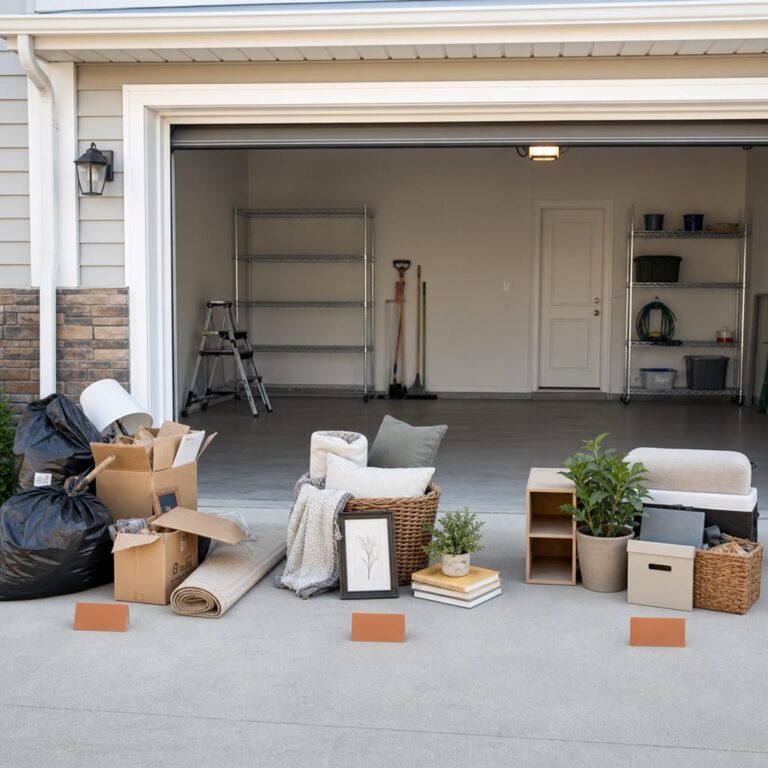
Most first-time garage organizers buy the wrong thing first. They reach for the biggest plastic totes they can find, load them with hand tools, and discover they can’t lift the bin a week later. Or they buy an overhead rack on impulse and realize they have no idea which way the joists run. The categories that actually move the needle for a beginner are smaller, cheaper, and less photogenic — but they save the weekend.
This guide covers six product categories that form a starter kit you can build over two weekends: floor shelving, two flavors of wall system (track and pegboard), a hook kit for the in-between cases, a properly-sized bin set, and a labeling tool. It does not cover slatwall, bike-specific racks, dedicated tool chests, or overhead storage — those are the next tier.
Quick Picks
| Pick | Product | Best for | Type | Watch out for | CTA |
|---|---|---|---|---|---|
| Best Starter Shelving | Seville Classics UltraDurable 5-Tier | First shelving unit for almost any garage | Open wire shelving | Confirm leveling feet, not casters | View on Amazon |
| Best Starter Wall System (Track) | Rubbermaid FastTrack 15-Piece Starter Kit | Beginners who want a wall that evolves over time | Wall-mounted track + accessories | Rail must hit at least two studs | View on Amazon |
| Best Starter Wall System (Pegboard) | Wall Control Metal Pegboard Kit | See-everything organizers | Metal pegboard + hooks | Different mounting screw spacing vs hardboard pegboard | View on Amazon |
| Best Starter Hook Kit | HORUSDY 10-Pack Wall Hooks | Beginners who want to hang one thing at a time | Loose screw-in hooks | Capacity assumes a stud, not a drywall anchor | View on Amazon |
| Best Starter Bin Set | IRIS USA WeatherPro 19-Quart 6-Pack | Beginners who want to categorize without overloading | Latched-lid plastic bins | Measure shelf depth before ordering | View on Amazon |
| Best Starter Labeling Tool | Brother P-Touch PT-H110 | Anyone who knows an unlabeled system collapses | Handheld thermal label maker | AC adapter sold separately | View on Amazon |
How We Selected These Beginner Picks
We do not claim hands-on testing unless clearly stated. For this guide, we reviewed manufacturer specifications, retailer product pages, product documentation where available, and recurring patterns in public buyer discussions.
Because the beginner audience covers a wide range of garages — single-stall, two-stall, shared with a parked vehicle, attached, detached — we prioritized products that work across multiple garage types rather than products optimized for a specific edge case. We also prioritized products with stable, mature Amazon listings that have survived multiple selection cycles in our own corpus; new listings can rotate without warning and beginners are the audience least equipped to find the replacement.
Selection criteria:
- Fits a first-time garage owner’s budget — no premium-tier products in this guide
- Doesn’t require power tools beyond a cordless drill to install
- Mature listing with a stable ASIN history (verified during our fact-check pass)
- Mistake-resistant: the product can be used wrong, but the failure mode is recoverable without throwing the product away
- Covers a category a beginner actually needs — no niche specialties like ski racks or kayak hoists
- Has no prerequisites a beginner can’t easily evaluate (which is why overhead racks are not on this list — joist orientation and ceiling clearance need a separate decision)
What to Look for Before Buying (Beginner Edition)
Measure twice, buy once — your garage’s actual usable depth
The depth of your wall — from the wall surface to where a parked car’s mirror would intrude — is the single most important measurement before buying shelving. Most starter shelves are 18 inches deep; some are 24 inches. If you only have 22 inches of clearance from the wall to the car, a 24-inch shelf doesn’t fit. For more detail on shelving choices, see our deeper guide to garage shelves.
Stud-anchored vs surface-anchored — and how to tell the difference
Every wall-mounted product in this guide expects to be anchored into a stud. Studs in US-framed walls are typically spaced 16 inches on-center; a stud finder costs about as much as a single tote and pays for itself the first time you skip a failed drywall-anchor install.
How wall material affects what hooks you can actually use
A finished drywall garage wall behaves differently from an unfinished stud-bay garage wall. With finished drywall, you have to find the stud or use a rated anchor matched to the load. With unfinished walls, you can drive a screw directly into the stud through the air gap.
Why bin size is the most underestimated factor
A 27-gallon tote can hold 60 pounds of mixed contents — and very few beginners want to lift 60 pounds onto a shelf above shoulder height. Smaller bins (19 quarts or so) force you to categorize and stay liftable. Bin size is a workflow decision, not a storage decision.
Best Starter Shelving: Seville Classics UltraDurable 5-Tier (36″ × 18″ × 72″)
Best for: First-time garage owners who want one shelving unit that pairs reliably with whatever bins they end up buying.

Short verdict: The default first-shelving pick. Open wire deck, NSF-certified, 18-inch depth that hits the sweet spot for plastic totes without crowding a starter wall.
The Seville UltraDurable 5-tier is the most-recommended configuration for residential garages. The 36-inch width fits a single stud-bay span, the 72-inch height stops short of needing a ladder, and the 18-inch depth accommodates standard plastic totes without overhang. The manufacturer lists this unit at 800 pounds per shelf on leveling feet (with total system capacity of 4,000 pounds).
Why it stands out
What separates this from look-alike wire shelves is listing stability. Seville maintains its own product pages with consistent specs — a signal that today’s listing matches next week’s unit. The chrome wire deck is also universally compatible: stand bins on it, hang light items from the underside, or pair it with a wire-shelf liner.
It can work well for:
- Plastic totes and storage bins (the 18-inch depth is sized for them)
- Tool boxes and small power tools in original cases
- Bagged or boxed seasonal items
- Gardening supplies in trays
Key specs to check
- Dimensions: 36-inch width × 18-inch depth × 72-inch height
- Manufacturer-listed at 800 pounds per shelf on leveling feet (drops significantly when assembled on the included wheels)
- NSF certification
- 1-inch height adjustability between shelf positions
- 5 shelves total; assembly hardware and leveling feet included
Recurring feedback patterns
Recurring positive feedback often centers on assembly speed — the rubber-sleeve and snap-collar system goes together in about thirty minutes solo, and most buyers report the shelves stay level once locked in. Common complaints typically involve the open wire deck letting small items slip through; a low-cost shelf liner solves it. Several buyers mention that the chrome finish can spot if stored in a damp, unheated garage.
Potential drawbacks
The leveling-feet design works on flat concrete but rocks on any garage floor sloping more than half an inch over four feet. The shelf is also not designed to be moved frequently — the optional caster kit reduces the manufacturer-listed per-shelf capacity significantly.
Buyer warning
Assemble the unit on leveling feet — not the included wheels — to hit the manufacturer-listed capacity. Switching to the wheels reduces the per-shelf rated capacity significantly. If you plan to store smaller items, plan to add a wire-shelf liner or pair the shelf with the bin set later in this guide.
Best Starter Wall System (Track-Based): Rubbermaid FastTrack 15-Piece Starter Kit
Best for: Beginners who want a wall that can evolve — start with five hooks, add a shelf later — without committing to a full slatwall buildout.
No products found.
Short verdict: A single horizontal rail spans the wall and accepts a flexible mix of hooks and shelves. The most-recommended “first wall system” for incrementalists.
FastTrack works on a simple idea: stud-anchored steel rails do the load-bearing work, and everything you hang from them slides on without further drilling. That makes it forgiving for beginners who don’t yet know what they want on the wall. Hang a rake, slide it three feet over without leaving holes in the drywall. The 15-piece starter kit ships with four rails plus eleven hooks. To compare other wall storage approaches, see other wall-mounted garage storage systems.
Why it stands out
The editorial advantage is that the rail is the only load-bearing component. Once you anchor it into at least two studs, every accessory you slide on becomes a low-stakes decision — no more drilling. That’s a different mental model from a hook kit, where every hook is its own commitment. Layout decisions stay reversible.
It can work well for:
- Yard tools (rakes, brooms, shovels)
- Garden hoses and extension cords
- Lightweight sports equipment
- A combination of hanging items and one or two flat shelves
Key specs to check
- Number of rails included (the starter kit lists 4 rails plus 11 hooks)
- Manufacturer-listed total system load when anchored into wall studs per instructions
- Stud spacing the rails can span (designed for 16-inch on-center framing)
- Mix of hooks and accessories in the starter kit
- Compatibility with the broader FastTrack accessory line for future expansion
Recurring feedback patterns
Recurring positive feedback often centers on the slide-and-lock mechanism — accessories click into place firmly and slide laterally for adjustment. Common complaints typically involve the kit composition varying between batches; some buyers receive a different accessory mix than the listing photo shows. Several buyers mention that mounting the rails requires precise leveling, since any tilt amplifies across the rail length.
Potential drawbacks
The rail’s strength assumes solid stud anchoring. With finished drywall you need a stud finder you trust. Surface anchors alone — drywall toggles, butterfly anchors, plastic plugs — fail under tool weight even when packaging claims otherwise.
Buyer warning
Each rail MUST hit at least two studs to carry the manufacturer-listed system load. Plan your mounting location to span two studs before drilling. If the only flat wall section you have is between studs, either reposition or add a horizontal wood blocking strip first. Drywall anchors alone will eventually let the rails pull out under accessory load.
Best Starter Wall System (Pegboard Alternative): Wall Control Metal Pegboard Kit
Best for: Visual organizers who want to see every tool at once instead of threading items onto a rail.

Short verdict: Metal pegboard that doesn’t sag like hardboard, paired with 35 starter hooks and brackets. The visual-organizer’s pick for a first wall buildout.
Wall Control replaces traditional hardboard pegboard with stamped steel panels. The benefit for a garage is that metal pegboard doesn’t bow under load over time, doesn’t absorb humidity in unheated garages, and accepts standard pegboard hooks. The starter kit ships with two 16-inch by 32-inch panels (roughly 32 inches of square wall coverage) plus 35 accessories — enough to outfit one workbench area.
Why it stands out
The differentiation from cheap hardboard is durability and dimensional stability. Hardboard pegboard in a garage that swings between 40°F and 90°F eventually warps, and the hooks sit at angles that let items slide off. Wall Control’s stamped steel panels stay flat. The mounting profile also adds a slight standoff distance from the wall, so standard hooks clip behind the panel face without shimming.
It can work well for:
- Hand tools (hammers, wrenches, pliers, screwdrivers)
- Small power tools that hang on standard pegboard hooks
- Spray cans, lubricants, and small hardware on shelf-style brackets
- Frequently-used tools that benefit from being visible
Key specs to check
- Panel dimensions (two 16-inch × 32-inch in the standard kit)
- Hook and bracket compatibility with your existing pegboard accessories
- Mounting screw count and stud spacing assumptions
- Manufacturer-listed per-square-foot capacity when mounted into studs
- Finish (galvanized + black panel options affect appearance, not capacity)
Recurring feedback patterns
Recurring positive feedback often centers on how flat the panels stay over time — buyers who replaced sagging hardboard frequently note the difference. Common complaints typically involve the mounting screw template differing from hardboard pegboard, which catches buyers who assumed the install would mirror their old setup. Several buyers mention the hook compatibility being broader than expected.
Potential drawbacks
Wall Control accepts most standard pegboard hooks, but a small percentage of cheap plated-steel aftermarket hooks don’t seat fully into the slot pattern. The panels also reflect light differently from hardboard — expect more glare off the metal surface under a single overhead fluorescent fixture.
Buyer warning
Hook compatibility is broad but not universal. If transferring an existing hook collection from hardboard pegboard, expect a small fraction of older hooks to not fit. Follow the included mounting template — Wall Control’s screw spacing differs from standard hardboard pegboard, and trying to reuse existing mounting holes typically results in panels that aren’t level.
Best Starter Hook Kit: HORUSDY 10-Pack Wall Hooks
Best for: Beginners who aren’t ready to commit to a full wall system and just want to hang a broom, a leaf blower, and a bike helmet.

Short verdict: Ten individual screw-in hooks across multiple profiles. Drive each one into a stud, hang one thing, done. The cheapest possible entry point into wall storage.
There’s a stage between “everything on the floor” and “I bought a full wall system” — where you want to hang three things and aren’t sure if you’ll ever want a fourth. A 10-pack bridges that stage. Each hook is independent — no rail, no system commitment.
Why it stands out
The editorial advantage is binary commitment. A rail asks for a buildout decision; a 10-pack asks only “where does this one thing live”. Most beginners use three to five hooks after a weekend — the rest become useful later. For more context, see our roundup of garage hooks for wall storage.
It can work well for:
- A single broom or rake
- A coiled garden hose on a J-profile hook
- A leaf blower or other handheld power yard tool
- A bike helmet or kid’s bike (light loads only)
- Folding chairs or step stools
Key specs to check
- Per-hook manufacturer-listed capacity (varies by hook profile — typically up to 50 lb when stud-anchored)
- Hook profile mix (J-hooks, utility hooks, screw-ins)
- Screw type and length included (verify they match a residential 2×4 stud, not just drywall)
- PVC or rubber tip on the hook end (matters for items you don’t want scratched)
Recurring feedback patterns
Recurring positive feedback often centers on having multiple hook profiles in one pack — a J-hook for the hose and a utility hook for the broom in the same box. Common complaints typically involve the included screws being too short for thick drywall over thick studs; many buyers swap them for longer wood screws. Several buyers mention the PVC tips can come loose over time on weight-bearing hooks.
Potential drawbacks
The kit is generic-brand, so listing stability is lower than for a major manufacturer — the exact hook-profile mix may not match the listing photo across batches. The coatings are also not as durable as heritage hardware brands; expect surface rust in unheated, damp garages over a few seasons.
Buyer warning
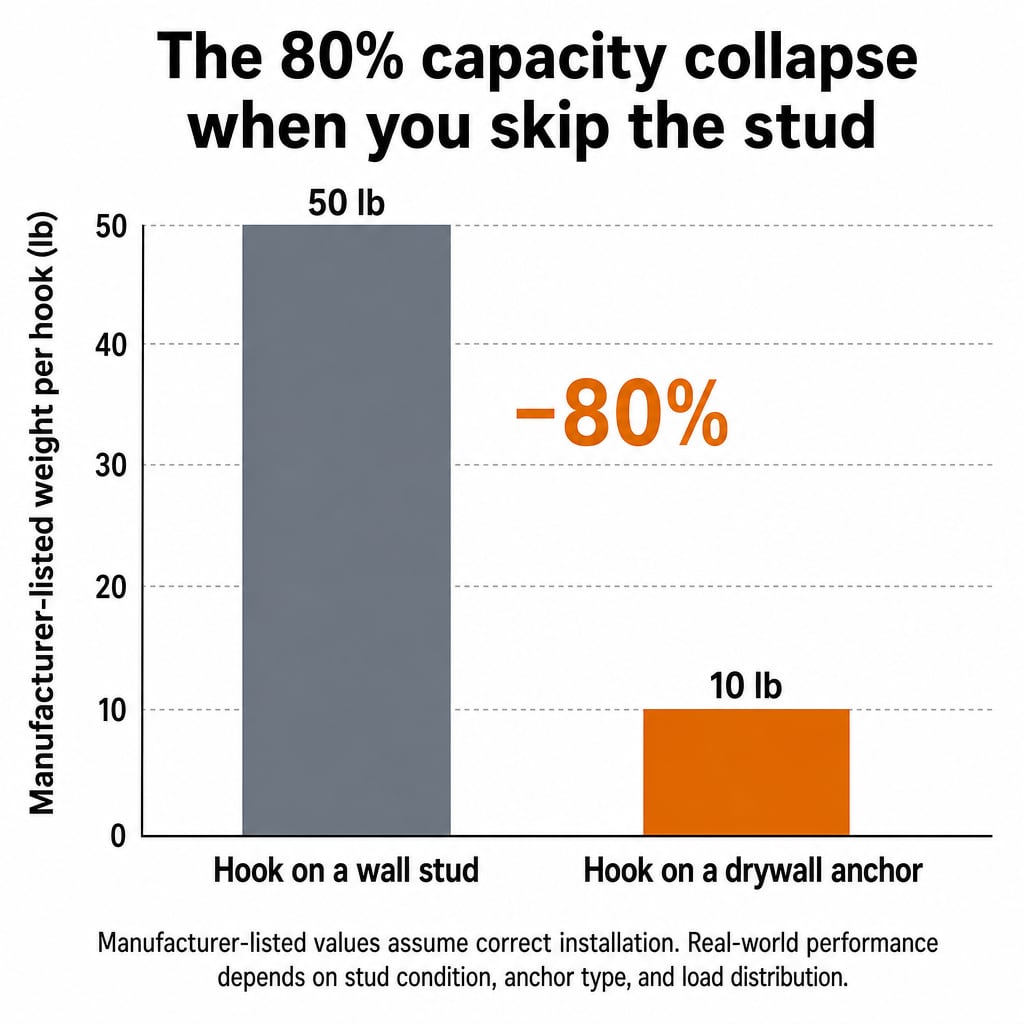
The 50-pound manufacturer-listed capacity assumes you drive the screw into a wood stud. A drywall anchor will not carry that load — most drywall anchors are rated for around 10 pounds, an 80 percent reduction from stud-mounted capacity. If you can’t hit a stud, choose a lighter item or use a wall-mounted shelf system that distributes load across two studs.
Best Starter Bin Set: IRIS USA WeatherPro 19-Quart 6-Pack
Best for: Beginners who instinctively reach for 27-gallon totes and then can’t lift them off a shelf two months later.

Short verdict: Smaller-format 19-quart bins with latching lids, matched-set 6-pack. Supports beginner workflows like “one bin per category, label every bin”.
The argument against starting with 27-gallon totes is biomechanical: a loaded 27-gallon tote weighs fifty to sixty pounds, and lifting that above shoulder height ends weekends with a sore back. A 19-quart bin caps out at 15 to 20 pounds — a motion most people can repeat for an afternoon. The IRIS USA WeatherPro line uses a latched-lid design that resists dust and pests, and the matched-set 6-pack ensures all six stack without gaps. For larger-format alternatives, see our compatible storage bins for shelves and racks.
Why it stands out
What makes this the right bin for beginners is the constraint: 19 quarts is small enough that you have to categorize before filling. With a 27-gallon tote you toss in “miscellaneous garage stuff” and end up with something hard to label. With a 19-quart bin, you’re forced to think “this is hand tools” or “this is winter gloves” — the constraint becomes the workflow.
It can work well for:
- Hand tools (one bin per category: screwdrivers, pliers, measuring tools)
- Seasonal items in small batches
- Hardware and small fasteners
- Sports equipment on a one-bin-per-sport basis
- Camping or outdoor gear
Key specs to check
- Internal dimensions: 16.9 inches long × 11.4 inches wide × 9 inches tall
- Stackability: manufacturer-listed compatible with stacking up to 5 units when latched
- Lid mechanism: latched (not snap-on)
- Material: polypropylene
- Set quantity: 6 bins, 6 lids included
- Opacity: varies between clear, translucent, and opaque depending on stock
Recurring feedback patterns
Recurring positive feedback often centers on the latch surviving the freeze-thaw cycle of unheated garages better than snap-on lids. Common complaints typically involve the bin being smaller than buyers expected from the listing photos. Several buyers mention buying a second 6-pack so the second half of the garage matches the first.
Potential drawbacks
The polypropylene is durable for stacking and handling but not impact-resistant if a heavy item drops on the lid from above. The latches require two-handed opening by design, which slows you down if you’re frequently retrieving items from the same bin.
Buyer warning
Measure your shelf depth before ordering. A 19-quart IRIS bin is 16.9 inches long — it fits an 18-inch shelf with margin, but a 12-inch utility shelf or narrow wall-mounted shelf will leave nearly five inches of front overhang. If your shelving is shallower than 18 inches, pick a different bin profile or upgrade the shelf first.
Best Starter Labeling Tool: Brother P-Touch PT-H110 Handheld Label Maker
Best for: Beginners who already know an unlabeled bin system reverts to clutter within four weeks.

Short verdict: Handheld thermal printer using TZe laminated tape. Survives garage temperature swings where paper labels curl and fall off, and the tape itself is forgiving — peel and reprint when you reorganize.
A garage organized without labels has a half-life. Within a month, you forget which translucent bin holds painter’s tape and which holds masking tape. The PT-H110 is the entry-level Brother P-Touch and prints to the same TZe laminated tape family that fits every other Brother labeler — so the tape investment carries forward when you outgrow this one. The laminated tape also survives the temperature swings of an uninsulated garage where adhesive paper labels fail.
Why it stands out
The editorial advantage is forgiveness. Beginners label things wrong the first time — “Hand tools” on a bin that should have been “Hand tools — measurement”. Because TZe tape peels cleanly without sticky residue and reprints quickly, mistakes don’t compound. For beginners, “the labeler that makes correction easy” wins over “the most accurate label maker”.
It can work well for:
- Plastic storage bin labels (every bin gets one)
- Pegboard hook labels (so the right tool returns to the right hook)
- Toolbox drawer labels
- Shelf labels for seasonal items
- Cord and cable labels
Key specs to check
- Tape compatibility: TZe tape family, widths 0.13 to 0.47 inch (0.47 is the standard 12mm size)
- Battery requirement: 6 × AAA batteries (not included), or optional Brother AD-24 AC adapter
- Built-in QWERTY keyboard
- Approximately 200 print symbols and decorative frames built in
- Label preview window before printing
Recurring feedback patterns
Recurring positive feedback often centers on tape adhesion across temperature ranges — buyers in cold-climate garages frequently mention labels staying stuck where paper labels failed. Common complaints typically involve battery consumption being higher than expected; many buyers recommend rechargeable AAAs or the AC adapter. Several buyers mention the small keyboard taking a few minutes to learn.
Potential drawbacks
The PT-H110 prints monochrome only, so you can’t color-code categories within the labeler (you can swap TZe tape colors instead). The 0.47-inch maximum tape width also limits readability at a distance; bigger workshop needs would justify the next-tier P-Touch.
Buyer warning
The PT-H110 ships without batteries and without the AC adapter — have 6 fresh AAA batteries on hand before a labeling session. For more than thirty labels, the AC adapter is the more economical choice and is sold separately. The TZe cartridge included is usually black-on-white standard, which is the right starter tape for most uses.
Side-by-Side Comparison
| Product | Best for | Type | Wall vs Floor | Beginner mistake it prevents | Watch out for |
|---|---|---|---|---|---|
| Seville Classics 5-Tier | First shelving unit | Free-standing wire shelving | Floor | Buying shelving that’s too deep for the wall | Confirm leveling feet, not casters |
| Rubbermaid FastTrack | Evolving wall layout | Track-based wall system | Wall | Drilling 15 holes for individual hooks | Rail must span two studs |
| Wall Control Pegboard | See-everything organizer | Metal pegboard | Wall | Buying sagging hardboard pegboard | Different mounting screw spacing |
| HORUSDY Hooks | Single-item hangs | Individual screw-in hooks | Wall | Committing to a system you may not need | Capacity collapses without a stud |
| IRIS USA 19-qt | Categorized bin storage | Latched-lid plastic bins | Shelf | Buying bins too big to lift | Measure shelf depth first |
| Brother PT-H110 | Labeling the system | Thermal label maker | Workflow tool | The unlabeled-bin collapse | Bring batteries and AC adapter |
Starter Kit by Garage Type — Choose Your Path
Different garages need different starter kits. A two-car garage with full wall access has different priorities than a shared garage where the car still parks. This matrix collapses the decision into one read: which products to start with, which to add later, and which to skip on day one.
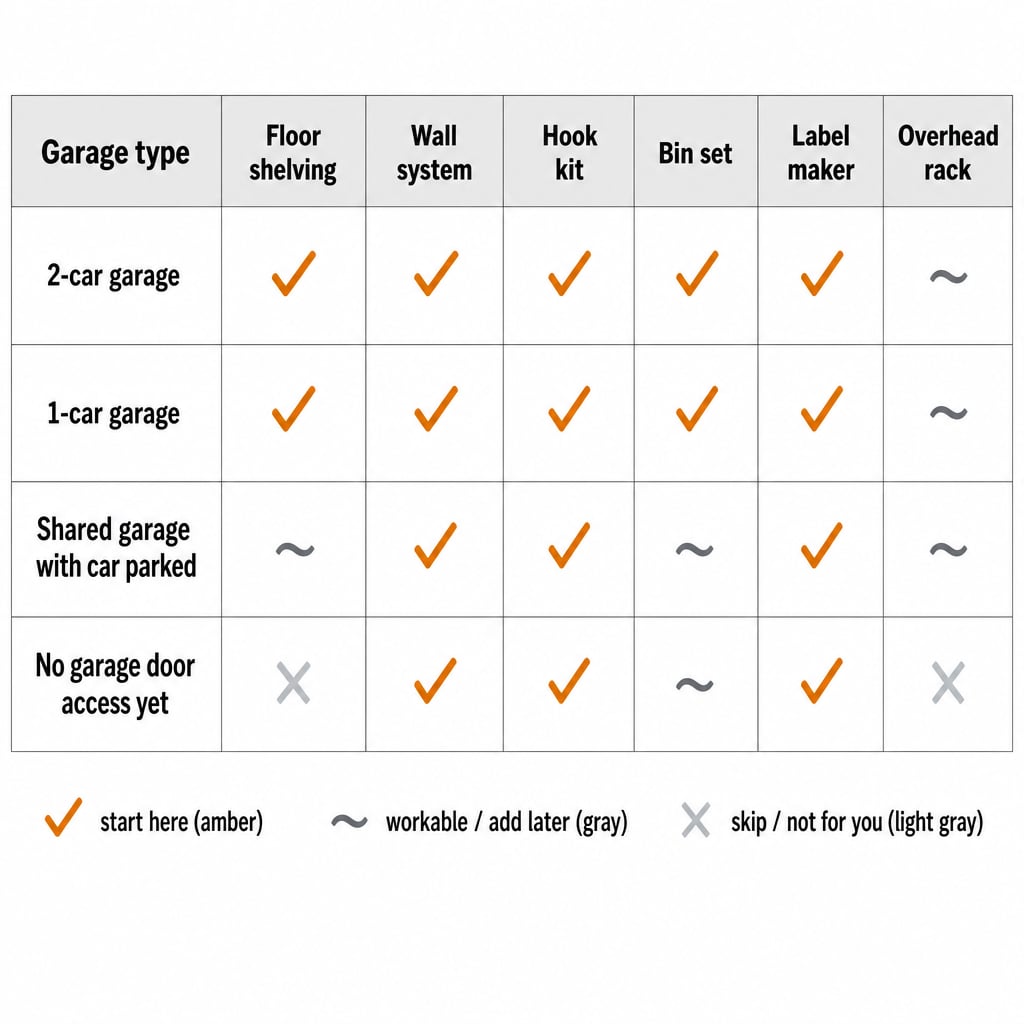
| Garage type | Floor shelving | Wall system | Hook kit | Bin set | Label maker | Overhead rack |
|---|---|---|---|---|---|---|
| 2-car garage | Start here | Start here | Start here | Start here | Start here | Add later |
| 1-car garage | Start here | Start here | Start here | Start here | Start here | Add later |
| Shared garage with car parked | Add later | Start here | Start here | Add later | Start here | Add later |
| No garage door access yet | Skip | Start here | Start here | Add later | Start here | Skip |
The “no garage door access yet” row reflects the under-construction or post-storm scenarios where the door isn’t operable. In those cases, anything you put on the floor is at risk of weather damage, so wall-mounted storage and labeled bins (stored elsewhere temporarily) make more sense as starting points.
How to Measure Your Garage Before Buying Anything
A 30-minute measurement session saves at least one return trip per product. Use a tape measure and write the numbers down.
- Wall depth (where shelving will go): Measure from wall surface to where a parked vehicle’s mirror intrudes. Minimum 20 inches clearance for an 18-inch shelf.
- Wall stud spacing: Most US framed walls are 16 inches on-center. Verify with a stud finder. Older homes (pre-1960s) sometimes have 24-inch or irregular spacing.
- Ceiling height: Note this for future overhead rack feasibility — even if you’re not buying one now.
- Door swing arc: Measure where the garage door’s tracks intrude into wall space. Wall storage in the swing zone gets hit by the door.
- Outlets and switches: Map them before mounting. Shelving blocking the wall switch is a frustration that compounds daily.
- Floor flatness: Quick level check across a 4-foot span tells you whether free-standing shelving will rock.
Common Complaints and Buyer Warnings
Almost every common beginner mistake traces back to two things: skipping the measurement step before buying, and skipping stud detection before mounting. The starter kit in this guide is designed to be forgiving of small errors, but a few specific mistakes can sink the project entirely.
The 27-gallon tote mistake
The most common buying mistake is reaching for the biggest totes available under the belief that bigger means more storage. A 27-gallon tote loaded with mixed contents weighs fifty to sixty pounds — awkward to lift and impossible to lift repeatedly without strain. The 19-quart format caps loaded weight at a manageable 15 to 20 pounds.
The “I’ll just use drywall anchors” mistake
The bar chart above tells the story: a wall hook manufacturer-listed at 50 pounds drops to roughly 10 pounds when installed in drywall instead of a stud. Manufacturer-listed values assume correct installation, and real-world performance depends on stud condition, anchor type, and load distribution. Drywall anchors have their place for light decorative items under 15 pounds, but not for garage tool loads.
The overhead-rack-before-joist-check mistake
Overhead racks aren’t on this starter list because they require knowing your ceiling joist orientation, joist spacing, and clearance above the garage door’s open position. Buying one before checking these is the most expensive beginner mistake. When you’re ready, check our recommendations for what to hang on garage walls instead, or look at dedicated overhead-rack guides once joist layout is confirmed.
The unlabeled-bin mistake
Translucent bins look like they should be self-labeling — you can see contents through the wall. In practice you can’t, especially across a row of stacked bins where only the front face is visible. Every bin should have a label readable from across the garage.
Who Should Avoid Starting Here?
This starter kit is not for everyone. Skip it or pick selectively if any of the following apply:
- You already have a working organization system. If shelves are up, hooks are installed, and you just need one more product, look at the category-specific guides rather than the full starter kit.
- You’re renting and your lease forbids drilling. Free-standing shelving and bins still work, but the wall-mounted products (FastTrack, Wall Control, HORUSDY hooks) all require permanent screw anchoring.
- Your garage is uninsulated in an extreme climate. Subzero winters or 110°F summers will shorten the life of plastic bins (brittleness in cold, warping in heat). In those cases, focus on metal-based storage first.
- You’re a heavy-machinery hobbyist or have a working bench setup. The manufacturer-listed capacities in this guide are sized for typical residential garage loads (sub-50 lb per hook, sub-600 lb per shelf). Tool-chest and rolling-cabinet setups need their own load planning.
For readers who have the basics handled, the next tier is overhead storage — but only after confirming joist orientation and ceiling clearance. Other useful next-step reads include our deeper guide to garage shelves for storage bins and our roundup of wall-mounted garage storage systems for when you’re ready to expand beyond a single rail.
FAQ
What should a beginner buy first — shelves, hooks, or bins?
Shelves and one wall system first, hooks second, bins last. Empty shelving is easier to position than loaded bins, and you want to know where things live before filling them. Buying bins first usually ends with bins sitting on the floor until shelving arrives.
Do I really need a label maker, or can I just use a Sharpie?
A Sharpie works on plastic short-term. The problem appears six months later when you want to repurpose a bin: Sharpie leaves marks that are hard to remove, and you end up with a layered history of crossed-out labels. A thermal label maker prints peel-and-replace labels that keep bins reusable.
Is it safe to skip stud detection if I’m only hanging light items?
For items under 15 pounds, a properly-rated drywall anchor can carry the load. The danger is the gray zone between 15 and 30 pounds: a leaf blower weighs around 12 pounds dry but closer to 18 pounds wet, and a coiled hose can pull 25 pounds with water. Plan for loaded weight, not dry weight.
Wall-mounted track vs pegboard for a first-time garage owner?
Track systems like FastTrack work better for tool-heavy users storing rakes, brooms, hoses, and longer items. Pegboard like Wall Control works better for hand-tool collections — wrenches, hammers, pliers — and for visual organizers who want everything visible.
How many bins should I buy in the first batch?
Six to eight is the sweet spot. More creates clutter before you’ve figured out categories; fewer forces you to overload each bin.
Can I skip the overhead rack entirely?
Yes — especially as a beginner. Overhead is the highest-leverage move once basics are in place, but it’s also the highest-risk install. Many beginners go their first year without it.
How long does it take to install a starter kit like this?
Two weekends. The first covers measurement, planning, and mounting shelving + wall system. The second covers loading bins, labeling, and adjusting hook positions. The labeling step alone is two to three hours done right.
Sources Reviewed
For this guide, we reviewed manufacturer product information, retailer specifications, Amazon product listings, public customer feedback patterns, and garage-organization-specific discussions. We focused on product details that matter for a beginner audience, including shelf depth, manufacturer-listed per-shelf and per-hook capacity, wall mounting hardware compatibility, stud spacing assumptions, bin internal dimensions, label tape compatibility, and the typical mistakes documented in public buyer discussions.
Related Guides
- Best garage shelves for storage bins and totes
- Best wall-mounted garage storage systems
- Best garage hooks for wall storage
- Best garage storage bins for shelves and racks