How to Install a Pegboard in Your Garage (Step-by-Step)
Last updated:
Disclosure: This article contains affiliate links. If you buy through these links, we may earn a commission at no extra cost to you. We do not claim hands-on testing unless clearly stated.
Most “how to install pegboard” guides treat every garage wall the same — find a stud, drive a screw, done. Walls aren’t the same. A stud you can hit, drywall with no stud in reach, poured concrete, and hollow block each need a different fastener, and each fastener carries a different manufacturer-published rating. This guide answers the one question that actually decides whether your pegboard stays on the wall: for your wall type, which fastener holds a loaded panel, and how much can it actually carry? Then it walks the rest of the install around that answer. For choosing between pegboard, slatwall, and rail systems before you buy one, see our best garage wall storage systems guide.
Measure before you buy: panels run 16, 24, 32, and 48 inches wide, and the usable reach zone for most adults is roughly 36 to 78 inches off the floor. Neither number depends on your wall type — the fastener does.
Find Your Wall Type
A pegboard panel is only as strong as what’s holding it, and “wall” isn’t one substrate:
- Drywall over a wood stud you can reach. The best case. Studs are usually 16 or 24 inches on-center; run a stud finder across the panel’s mounting holes before you buy anchors you won’t need.
- Drywall with no stud in reach. You need a hollow-wall anchor rated for drywall — not the plastic anchor in the bottom of a junk drawer.
- Poured concrete — a foundation wall, or an exterior-facing garage wall. Needs a concrete screw anchor.
- Hollow concrete block (CMU). Common on older or unfinished garages. Needs an anchor rated for a hollow substrate; a concrete-only anchor can strip the thin face shell.
- Plywood sheathing with no drywall. Fastener-wise, treat it like drywall: find the framing behind it if you can. See the note below the table — it’s the one wall type none of the fastener manufacturers publish a number for.
Which fastener holds a loaded pegboard, by wall type
Most pegboard install guides say "use the right anchor for your wall" and stop there. This table names the anchor, quotes the manufacturer’s own pull-out or shear rating for it, and works out — showing the arithmetic — what that means for a full panel, for the wall types a residential garage actually has: a stud you can hit, drywall you can’t, poured concrete, and hollow block. Where nobody publishes the number (a screw in plywood sheathing alone), it says so instead of guessing.
| Wall type | Fastener / anchor | Manufacturer rating as published | Rating type | Rated load per panel (working load, not ultimate) | Working | Spacing / edge distance for full rating | Specification source | Source checked |
|---|---|---|---|---|---|---|---|---|
| Drywall over wood stud — screwed into the framing | Wood screw into the stud (mounting screws supplied with a metal pegboard kit) | 200 lb per panel into studs | manufacturer per-panel recommendation (already a working figure, not a lab ultimate) | 200 lb | Quoted directly. Wall Control states this as its own recommendation for a correctly installed 16 x 32 in panel — no arithmetic of ours involved. | 6 mounting points per panel, aligned to 16 in stud centres | Wall Control 16 x 32 in Metal Pegboard — product specifications | 2026-09-17 |
| Drywall only, no stud within reach — kit-included anchor | Drywall anchor supplied with the kit (Wall Control does not name the anchor type) | 100 lb per panel with drywall anchors | manufacturer per-panel recommendation | 100 lb | Quoted directly, same source and panel as the row above. Wall Control does not say which anchor is in the box, so there is no anchor-level spec to check independently — this number is only as good as the manufacturer’s own claim. | same 6-point pattern as the stud row | Wall Control 16 x 32 in Metal Pegboard — product specifications | 2026-09-17 |
| Drywall only, no stud within reach — upgraded to a rated toggle anchor | TOGGLER SNAPTOGGLE heavy-duty toggle bolt, 1/4-20 (Anchor Type BB) | 265 lb ultimate tensile pull-out and 241 lb ultimate shear, per anchor, in 1/2 in drywall | ultimate (independent lab test), per anchor — not a per-panel figure | approx. 396 lb tension / approx. 360 lb shear per panel | TOGGLER’s own note says industry standards recommend using 1/4 of the ultimate test load: 66 lb tension and 60 lb shear per anchor. Multiplied by 6 — the number of mounting points Wall Control uses on a panel this size (row 1) — for a per-panel figure, because TOGGLER publishes a per-anchor rating, not a per-panel one. That multiplication assumes all 6 anchors share the load evenly, which is optimistic: a hook near one edge loads the nearest anchor harder than the average. Treat the per-panel figure as an upper bound, not a target. | not published for anchor-to-anchor spacing in this document — SNAPTOGGLE’s table varies by drywall thickness and bolt size only | TOGGLER SNAPTOGGLE Heavy-Duty Toggle Bolts — Technical Data | 2026-09-17 |
| Solid poured concrete | Tapcon concrete screw anchor, 1/4 in diameter, 1 in embedment | 750 lb ultimate tension and 900 lb ultimate shear, per anchor, at 2,000 PSI concrete (the lowest strength Tapcon publishes for — a conservative stand-in if you don’t know your slab’s rating) | ultimate (lab), per anchor | approx. 1,128 lb tension / approx. 1,350 lb shear per panel | ITW Red Head states allowable loads are the ultimate test load divided by 4: 188 lb tension, 225 lb shear per anchor. Multiplied by 6 mounting points (the same borrowed assumption as the row above) for a per-panel figure — our arithmetic, not Tapcon’s own claim, and again optimistic about even load-sharing. | Full rated capacity needs 4 in spacing between anchors and 2-1/2 in edge distance from a corner or edge, for this anchor diameter. Closer than that, the manufacturer’s own reduction factor cuts capacity to as little as 0.66x at 2 in spacing or 0.82x at 1-1/4 in edge distance. A 16 x 32 in panel’s mounting holes are far enough apart that spacing isn’t the constraint; edge distance can be, if you mount close to a wall corner. | Tapcon Screw Anchor — Technical Data (ITW Red Head) | 2026-09-17 |
| Hollow concrete block (CMU) | Tapcon concrete screw anchor, 1/4 in diameter, 1 in embedment | Lightweight block: 250 lb ultimate tension, 620 lb ultimate shear. Medium-weight block: 500 lb ultimate tension, 1,000 lb ultimate shear. Per anchor. | ultimate (lab), per anchor | Lightweight block: approx. 378 lb tension / approx. 930 lb shear per panel. Medium-weight block: approx. 750 lb tension / approx. 1,500 lb shear per panel. | Same divide-by-4 rule as the concrete row: lightweight block allowable is 63 lb tension / 155 lb shear per anchor; medium-weight is 125 lb tension / 250 lb shear. Multiplied by 6 mounting points, same borrowed assumption and the same caveat about even load-sharing. Tapcon does not publish a way for a homeowner to tell "lightweight" from "medium-weight" block by eye — if you don’t know your block, the lightweight figure is the conservative one to plan around. | Tapcon’s technical data does not publish a block-specific spacing/edge-distance table separate from the concrete one above. | Tapcon Screw Anchor — Technical Data (ITW Red Head) | 2026-09-17 |
How these numbers were produced: Every "published" figure is quoted from the fastener manufacturer’s own technical data, retrieved directly from the manufacturer’s site. Where a manufacturer states a safety factor (TOGGLER and Tapcon both publish "divide the ultimate test load by 4" for a working load), that factor is applied and the arithmetic shown in the Working column. Where no manufacturer publishes a per-panel figure, the per-anchor working load is multiplied by 6 — the number of mounting points Wall Control’s own 16 x 32 in panel uses (its own product page states the count) — to produce a comparable per-panel number. That multiplication is ours, not the anchor manufacturer’s, and is flagged in every row that uses it.
- These are working (allowable) loads, already divided down from each manufacturer’s lab-ultimate numbers by that manufacturer’s own stated safety factor — not a promise, and not a substitute for installing the anchor at the depth, drill-bit size and spacing the manufacturer specifies.
- The concrete, block and upgraded-drywall rows borrow Wall Control’s 6-mounting-point count to turn a per-anchor rating into a per-panel one. That is our arithmetic, not a figure TOGGLER or Tapcon publish, and it assumes the load splits evenly across all 6 points — a hook loaded near one edge stresses the nearest anchor harder than this average suggests.
- We could not find a pull-out or shear rating, from a fastener or pegboard manufacturer, for a screw driven into plywood sheathing without hitting the framing behind it. If your garage wall is plywood, treat it like drywall: find the stud (the sheathing’s own nailing pattern usually reveals the lines) and use the stud row below. That is a workaround, not a sourced number, and we are saying so rather than inventing one.
- Real-world capacity also depends on assembly, anchoring depth, floor level, and how evenly the load is distributed across the panel — the same caveat that applies to every load figure on this site.
- Block density ("lightweight" vs "medium-weight") is not something you can identify by eye from across the garage. If you don’t know which you have, plan around the lower lightweight-block figure.
Download the data (CSV) · last updated 2026-09-17 · version 1.0 · CC BY 4.0, attribution to Garage Space Guide.
What this means for your wall: two studs and the mounting screws that come in the box outrate every anchor option here — that’s the whole argument for finding them first. A single upgraded drywall anchor (SNAPTOGGLE) beats the generic kit-included anchor by roughly 3 to 4 times, working load to working load. Concrete and block anchors are individually rated higher than either drywall option, but every “rated load per panel” figure above past the first two rows is our own arithmetic, not a number any manufacturer publishes directly — it assumes six fasteners share a panel’s load evenly, which is optimistic.
Safety note: Manufacturer-listed capacity assumes correct assembly, level flooring, suitable mounting hardware where required, and proper weight distribution. Real-world performance can vary. Always follow the manufacturer’s installation instructions.
Installing the Right Fastener
Studs (best case)
Mark stud centerlines with painter’s tape before you mark anything else. Drive the panel’s mounting screws into at least two studs; where the hole layout doesn’t line up with a stud, fill the remaining holes with the anchor rated for your wall type rather than skipping them.
Drywall, no stud in reach
Skip generic plastic anchors — they’re not in the table above because none of them publish a comparable rating. A heavy-duty toggle bolt like TOGGLER’s SNAPTOGGLE uses a 1/2 inch drill bit for the 1/4-20 size and roughly triples what a typical kit-included anchor is rated for.
Concrete or block
Use a concrete screw anchor sized and embedded to the depth printed on its packaging. Block needs the anchor engaged in the solid face shell, not the hollow core; if you can’t tell whether your block is standard or lightweight, plan around the lower figure in the table.
Plywood, no stud in reach
There’s no manufacturer number for this case. Find the stud behind the plywood if you can. If you truly can’t, treat this as the weakest wall type on the page and load the panel conservatively.
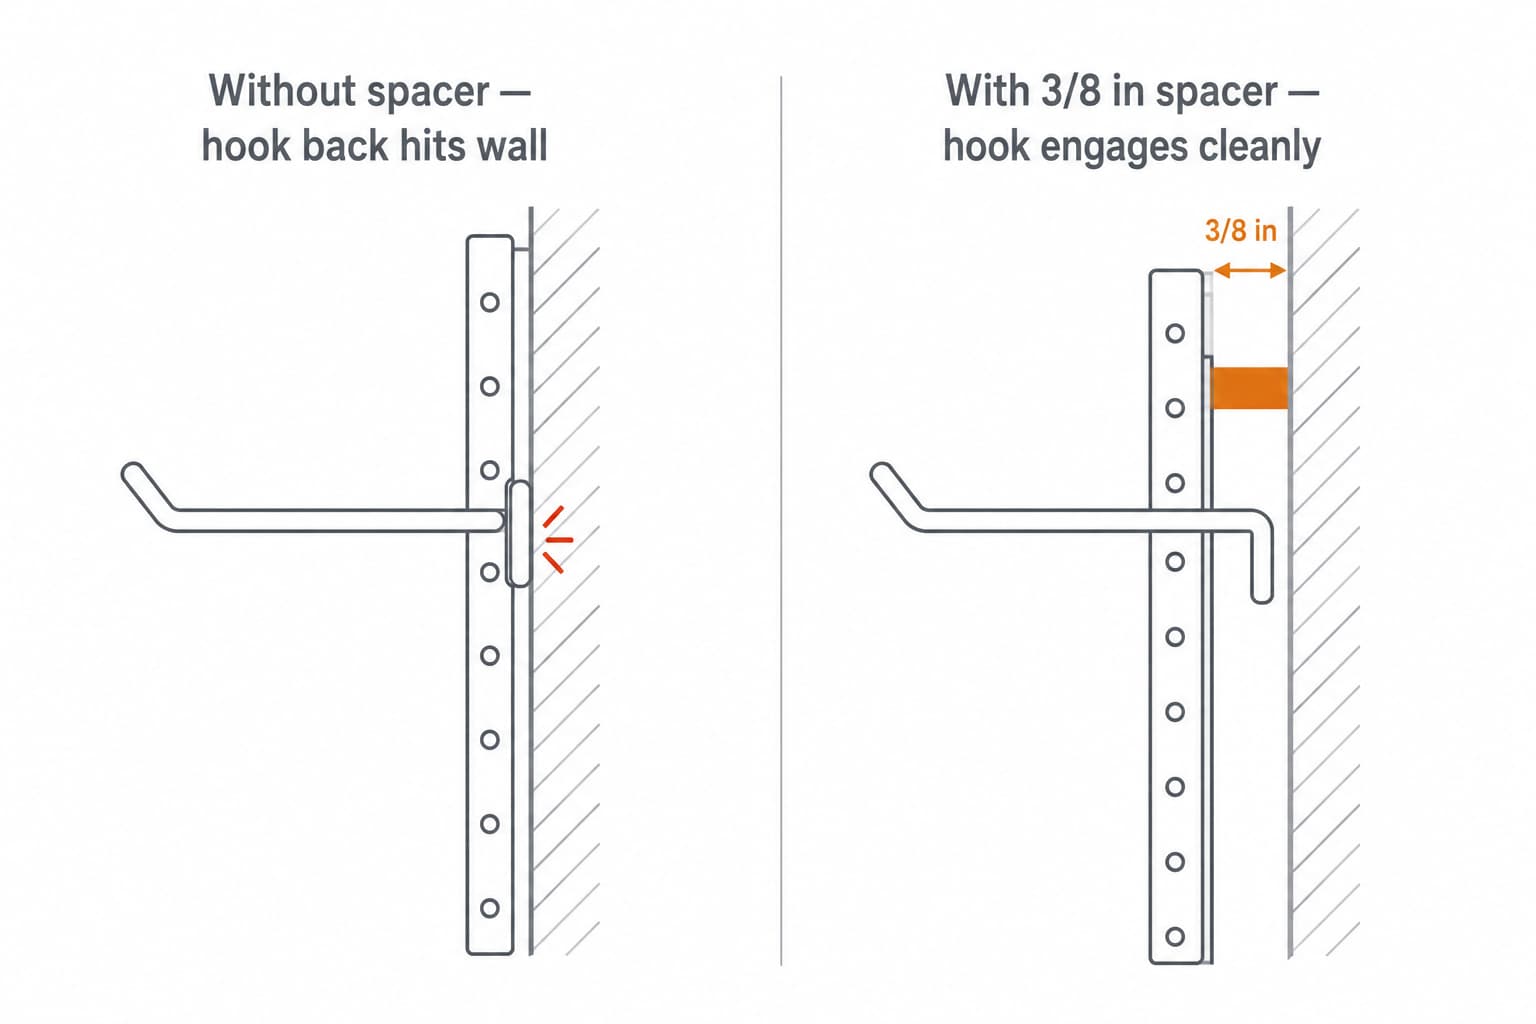
Whichever fastener you use, polypropylene panels also need a spacer kit — about 3/8 inch of standoff between panel and wall — for the hooks to engage; metal Wall Control panels build this in.
Once the panel is up, step back and check it’s level before the last fastener goes in — adjustment gets much harder afterward. Then hang your heaviest tools first. A wobble at this stage usually means a fastener that’s short of its rated depth, not a panel that needs more screws.
Tools and Products That Help
The pegboard decision is between metal (premium, includes hooks) and poly (budget, sheet-only) — both use the standard 1/4 inch hole pattern on 1 inch centers, so any hook you buy later fits either.
Metal pegboard kit — The Wall Control 4 ft kit (black panel + black accessories) is the canonical premium starter for a garage workbench area. The kit includes the panel, a starter assortment of hooks and brackets, and mounting hardware in one box. The manufacturer states the steel construction is over 10× stronger than conventional pegboard and carries a lifetime guarantee.

Polypropylene pegboard sheets — The Triton DuraBoard 4-pack covers a full 32 square feet — enough for a typical full-wall garage install. Panels are 24″ × 48″ white poly with the standard hole pattern. The manufacturer states roughly four times the holding strength of conventional pegboard and good resistance to humidity and temperature swings — both relevant in an unconditioned garage.

A reminder on the Triton path: the spacer kit is sold separately and is required. For heavier tool loads, see our best metal pegboards for garage tools roundup.
Common Mistakes
Mistake 1: Mounting only into drywall when studs are available
Drywall anchors fatigue under cycling loads — a hammer pulled off and put back daily works them loose over time. If a stud is within reach of a mounting hole, use it; reserve anchors for the holes that genuinely have no stud behind them.
Mistake 2: Assuming all concrete or block is the same strength
Tapcon’s own technical data rates the same anchor differently depending on concrete PSI and block density — a lightweight block anchor is rated at roughly half of a medium-weight block anchor for the identical screw. If you don’t know which you have, the table above gives you the conservative number to plan around instead of guessing high.
For readers who can’t drill at all (renters), see our renter’s garage organization checklist for a no-drill path.
FAQ
Can I install pegboard on concrete or block walls?
Yes, with a concrete screw anchor sized to the wall — see the table above for manufacturer-rated loads in poured concrete versus hollow block. Block needs the anchor seated in the solid face shell, not the hollow core.
What if I can’t find a stud behind my drywall?
Upgrade past the kit-included anchor to a heavy-duty toggle bolt (SNAPTOGGLE or equivalent) — it’s rated roughly 3 to 4 times higher, working load to working load. It costs more per anchor and needs a bigger hole, but it’s the difference between a panel that holds and one that doesn’t.
How much can a fully loaded pegboard panel actually hold?
It depends entirely on your wall type and fastener — see the table above. The panel itself is rarely the limit; what’s behind the wall is.
Sources Reviewed
This article synthesizes manufacturer technical data (TOGGLER SNAPTOGGLE toggle bolts, Tapcon concrete screw anchors via ITW Red Head, Wall Control metal pegboard, Triton Products DuraBoard polypropylene pegboard), and GSG editorial. We do not claim hands-on testing unless clearly stated.
Related Guides
- Best Garage Wall Storage Systems — choosing between pegboard, slatwall, and rail before you install anything
- Best Metal Pegboards for Garage Tools — if your tool load calls for the strongest panel, not just the strongest anchor
- Garage Organization Checklist for Renters — the no-drill path if none of the fasteners above are an option