How to Set Up a Tool Wall in Your Garage
Disclosure: This article contains affiliate links. If you buy through these links, we may earn a commission at no extra cost to you. We do not claim hands-on testing unless clearly stated.
Most garage tool-wall regret traces to one missing step: laying out the wall on paper before mounting anything. The product choice (pegboard vs slatwall) gets all the attention; the layout step that determines whether the wall actually works gets skipped. This guide walks through all five steps in order — inventory, zone, lay out on paper, install, iterate — and points to the system-specific install guides for the format you pick. By the end you’ll have a tool wall you still like in year five, not one you’ve already torn down to redo.
What this guide does not cover: the system-architecture choice (pegboard vs slatwall vs magnetic) — that’s covered in how to choose a garage tool organization system.
Quick Answer: The Five Steps
- Inventory and group by frequency — pull every tool out, sort by daily/weekly/monthly use
- Pick the wall zone — best-lit, easiest reach, not blocked by vehicle door swing
- Lay out on paper — sketch the wall to scale, mark stud positions, place each tool by frequency
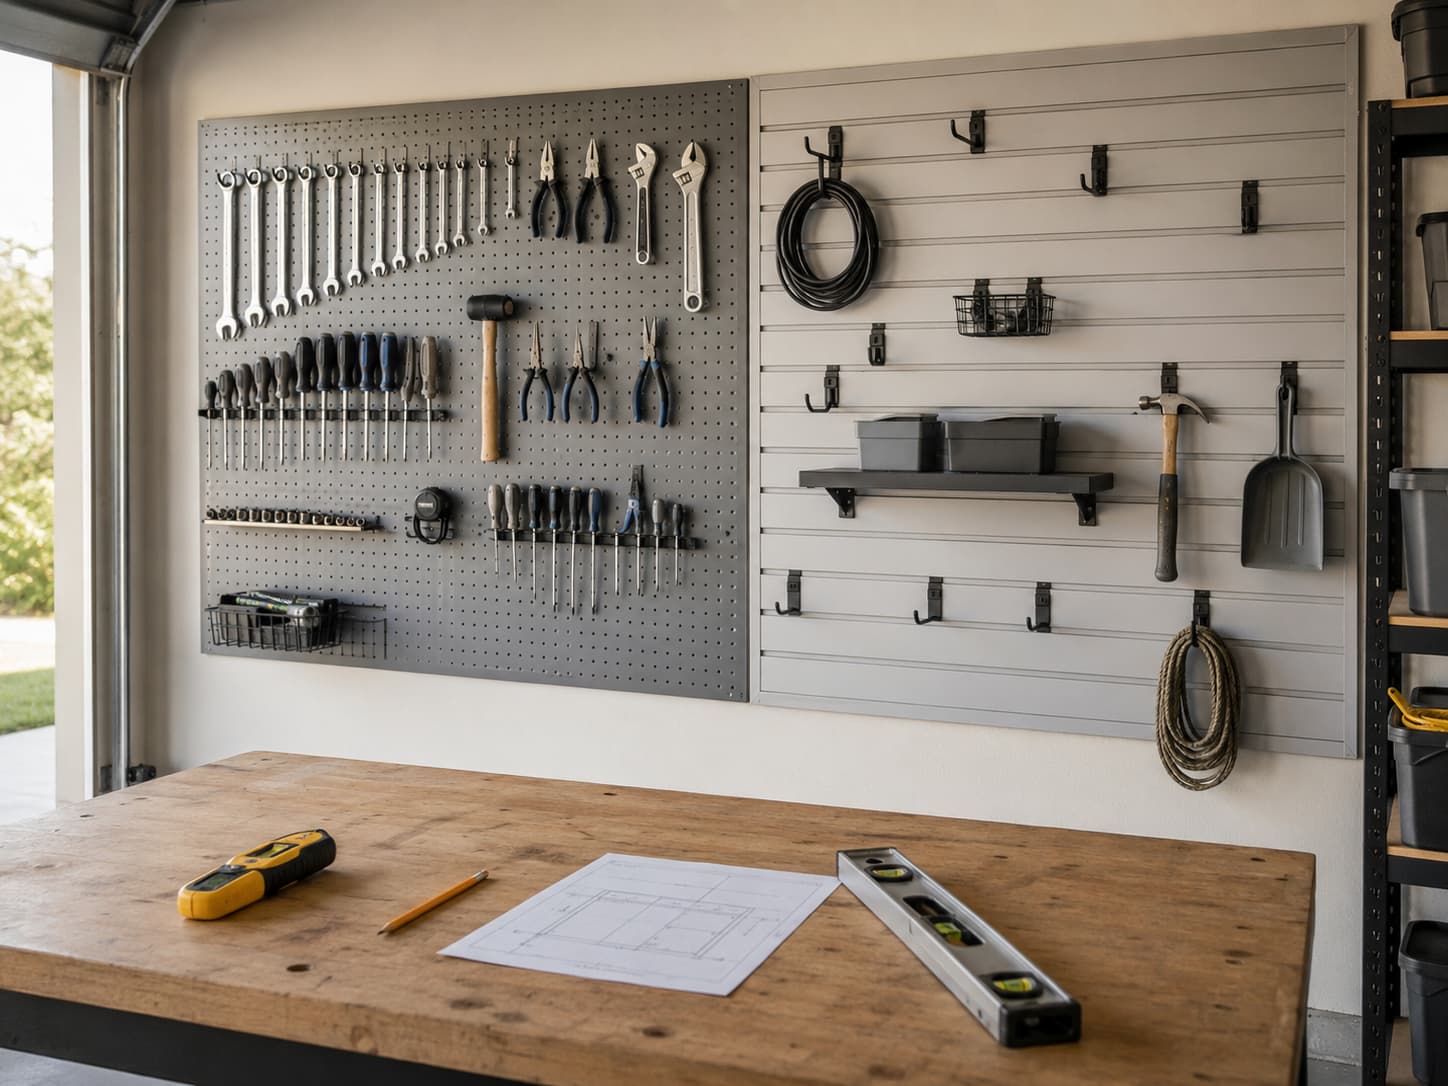
- Choose format (or hybrid) — pegboard for fixed tools, slatwall for changing tools, magnetic for bench-side metals
- Install in correct sequence — frame/panels first, hooks second, tools last
Steps 1-3 are planning; steps 4-5 are execution. Most readers spend 90% of their time on step 4 and 10% on step 3 — reverse the ratio and the wall works.
Step-by-Step
Step 1: Inventory and group by frequency
Pull every tool out of drawers, boxes, and existing storage. Lay them flat on the garage floor. Group into three frequency tiers: daily (workshop hand tools you touch every project), weekly (general DIY tools), monthly or rarely (specialized tools you forget you own).
Most home garages have 30-60 tools total. Frequency distribution typically: 10-15 daily, 15-25 weekly, 10-30 monthly. The frequency tiers drive placement in step 3.
Step 2: Pick the wall zone
The best wall for a tool wall is the one with: longest clean run, best lighting (natural or task), easiest reach from your typical work position, and NOT obstructed by the vehicle door swing arc. For broader zone-planning context, see how to plan garage organization zones.
In a two-car garage, this is usually the workbench wall opposite the garage door. In a single-car garage, it’s the side wall not eaten by the driver’s-side door swing.
Step 3: Lay out on paper (the step everyone skips)
This is the make-or-break step. Sketch the chosen wall section to scale on paper (1 inch = 1 foot is the working scale for residential garages). Mark stud positions (16 inches on center for standard US construction). Mark outlets, switches, windows, and any obstructions. Mark the vehicle door swing arc if it’s a concern.
THEN, with the sketch in hand, place each tool on the layout. Daily tools at eye level (4.5 to 6 feet up). Weekly tools below or above. Monthly tools on the top edge of the wall or in a closed cabinet adjacent. Group like with like (all wrenches together, all screwdrivers together).
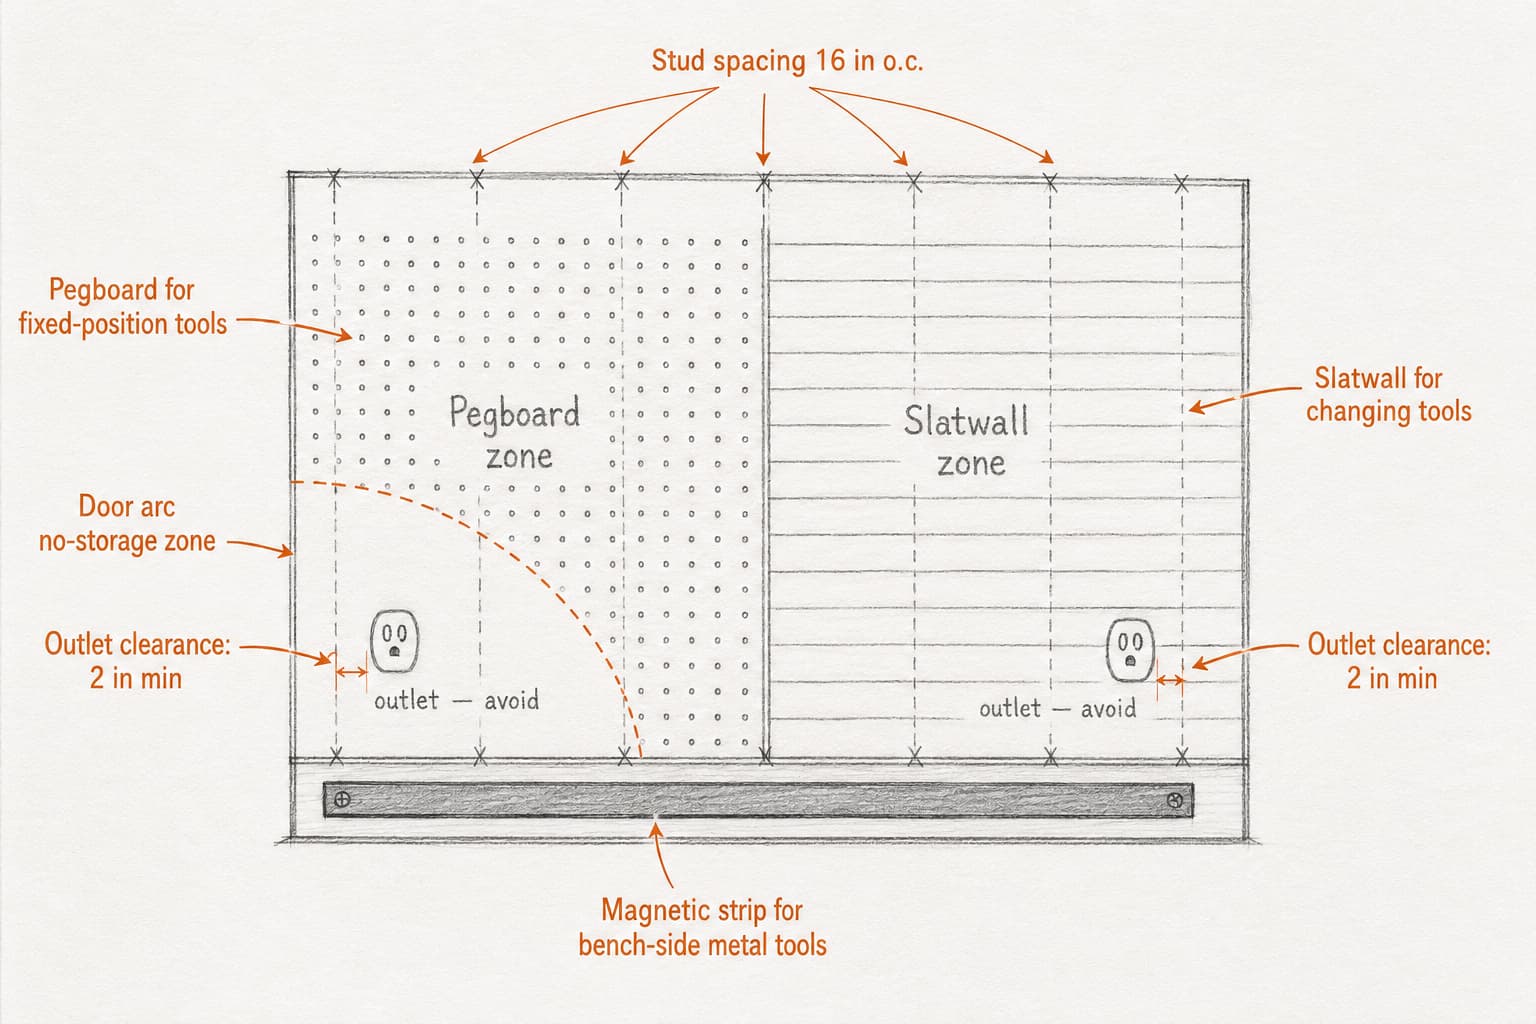
Why this step matters: layout mistakes are expensive to fix once mounted. A pegboard panel screwed into the wrong stud, a slatwall hook that conflicts with an outlet, a magnetic strip mounted where the vehicle door swings — all become permanent friction. Paper iteration is free.
Step 4: Choose format (or hybrid)
Match tool types to format:
- Pegboard — fixed-position tools (wrenches, hammers, screwdrivers you always store the same way)
- Slatwall — tools that change position over time (smaller power tools, accessories, baskets for parts)
- Magnetic strip — small ferrous metal tools at the workbench edge (chisels, pliers, small wrenches)
The hybrid pattern (pegboard + slatwall + magnetic, each in its zone) is the modern workshop default. For the format choice in detail, see how to choose a garage tool organization system. For pegboard-free alternatives, see how to organize garage tools without pegboard.
Step 5: Install in correct sequence
Sequence: frame/panels first, hooks second, tools last. Tempting to skip ahead and start hanging tools as you go — don’t. Place all panels first, level everything, then add hooks per layout, then tools.
For pegboard install specifics — straightforward (4-6 screws into studs per panel). For slatwall install, see how to install garage slatwall — more involved (longer panels, more anchors, level reference matters across the run).
After install, give yourself 2-4 weeks of actual use before considering the layout final. Layout iteration is normal.
Tools and Products That Help
Two starter format picks for the most common workshop scenarios. Both reused from earlier articles in the cluster — both verified active and in-stock.
For pegboard format: Wall Control 4 ft. Metal Pegboard Standard Tool Storage Kit

Galvanized metal panels, accepts both Wall Control’s slotted hooks AND standard 1/4-inch pegboard hooks — your hook collection grows independently of the panel brand. Branded manufacturer with independent website (strong ASIN stability). The starter format for the pegboard zone of a hybrid wall.
For slatwall format: FRAYSCENT 8’x4′ Slatwall Paneling
PVC slatwall covering 32 square feet with 15 accessories included. Hooks slide horizontally without unscrewing — pays off if you reorganize even once a year. Generic-brand listing — verify the SKU at purchase. The starter format for the slatwall zone of a hybrid wall.
For the broader product roundup beyond these two picks, see best garage tool organizers.
Common Mistakes
- Mounting before laying out on paper. The step that costs nothing and prevents 90% of regret. Skip it and you’ll be re-drilling.
- Forgetting the door-swing arc. Tool walls mounted in the driver’s-door arc zone get hit every time the car parks. Map the arc in step 3.
- Mixing pegboard and slatwall too tightly. Visual coherence matters. Keep each format in its own clear zone (one panel of pegboard, one panel of slatwall) rather than alternating panels.
- Not leaving room for future tools. A wall packed to 100% capacity has no room for the next tool you buy. Leave 20% empty.
- Mounting at the wrong height for your reach. “Standard” mounting heights assume a 6-foot operator. Adjust for your height — eye level is 4.5 to 6 feet for most adults; daily tools belong there.
FAQ
What height should I mount a tool wall at?
Bottom of the pegboard/slatwall panel at 36 to 42 inches from the floor (typical workbench-back height) puts the panel’s eye-level zone at 4.5 to 6 feet — daily tools land naturally. If you’re shorter or taller than average, adjust by 4-6 inches.
Pegboard, slatwall, or both?
Both, for active workshops. Pegboard for the tools that always hang in the same place; slatwall for the tools that move around. For low-budget setups, start with pegboard alone — it covers most needs.
Do I need to mount into studs?
Yes for any panel longer than 24 inches or holding more than a few light hand tools. Drywall anchors don’t hold a loaded tool wall over years. Find studs with an electronic stud finder, mount through panels into studs.
How big should my tool wall be?
Total tools × about 0.25 square feet per tool gives a rough capacity estimate. A 40-tool collection = roughly 10 sq ft of tool wall = a 4-foot-wide section about 30 inches tall. Larger collections need 16-20 sq ft.
How long does it take to set up?
Planning (steps 1-3): 1-2 hours. Install (step 4-5): 2-4 hours for a 4-foot pegboard kit, 4-6 hours for a full slatwall wall. Total weekend project for the typical install.
Sources Reviewed
For this guide, we reviewed manufacturer documentation for pegboard and slatwall systems, installation manuals where available, and recurring patterns in public discussions about garage tool-wall setup.
Related Guides
- How to choose a garage tool organization system
- How to organize garage tools without pegboard
- How to install garage slatwall
- Best garage tool organizers
- How to plan garage organization zones
- How to choose garage storage for tools and supplies