How to Organize a Garage Workbench
Last updated:
Disclosure: This article contains affiliate links. If you buy through these links, we may earn a commission at no extra cost to you. We do not claim hands-on testing unless clearly stated.
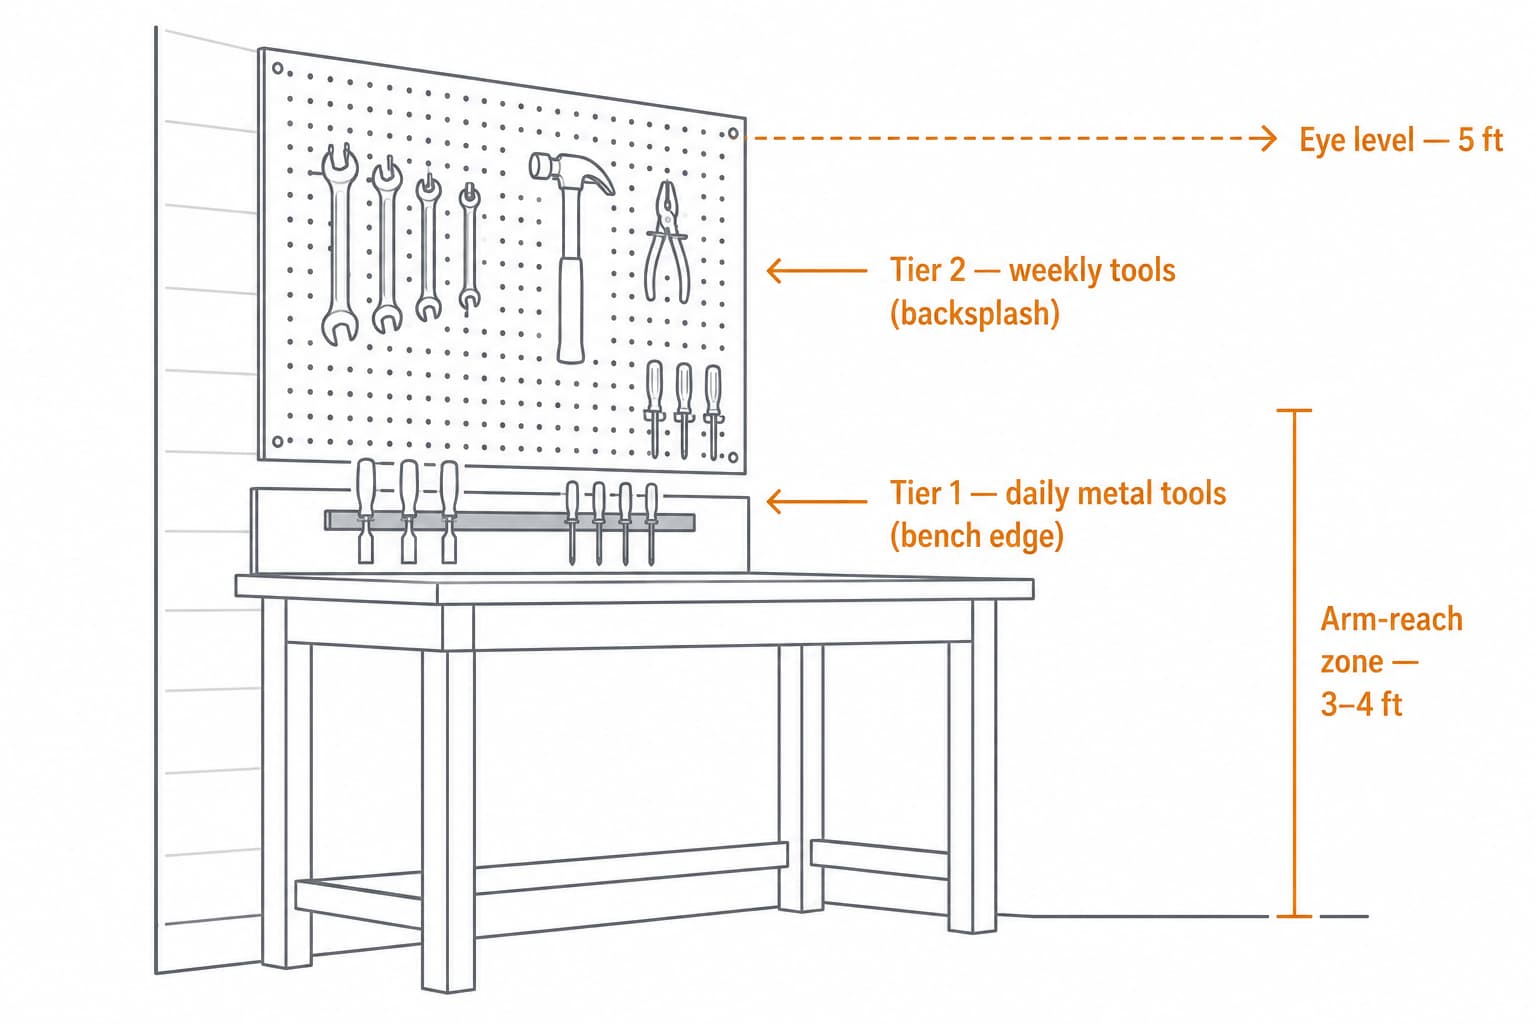
A workbench is organized when the surface stays clear. The rest is just storage placement. Most workbench-organization articles attack the problem with drawer organizers, lighting kits, and labeling systems — useful, but they miss the central principle: two zones, properly equipped, do 90% of the work. Tier 1 (bench edge) holds the daily-touch metal tools you reach for every minute. Tier 2 (wall backsplash) holds the weekly-touch tools that don’t need bench-surface proximity. Together they keep the surface clear without requiring willpower.
This guide does not compare specific workbenches — for that, see our roundup of garage workbenches with storage.
Quick Answer: The Two-Tier Method
- Tier 1 — bench edge → magnetic strip → daily-touch ferrous tools (chisels, screwdrivers with metal cores, small pliers, files)
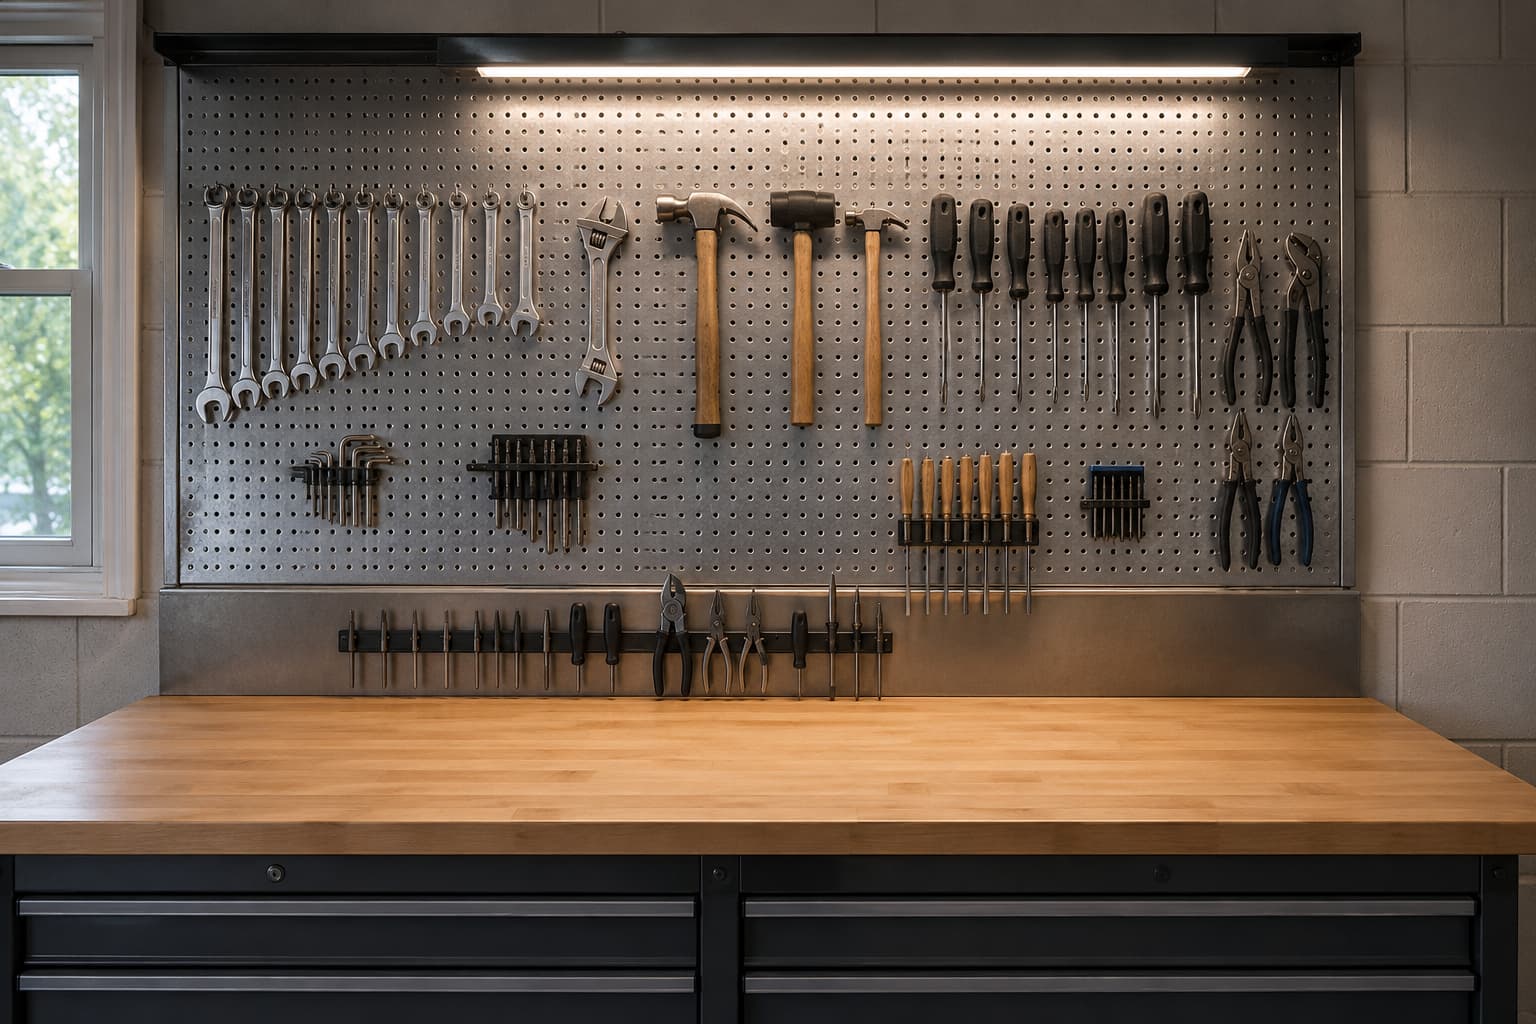
- Tier 2 — bench backsplash → pegboard → weekly-touch tools (larger wrenches, hammers, tape measure, level)
- Surface stays clear → projects happen
The principle: tools you touch every minute go at arm’s length on the bench edge (no reaching, no looking). Tools you touch every few projects go on the wall behind (one-step reach). Tools you touch monthly go in drawers or off the workbench entirely.
Step-by-Step
Step 1: Clear the bench (sounds obvious, isn’t)
Pull EVERYTHING off the bench surface. Yes, everything — including the “tools I’m using right now” pile. Put it on the floor or a temporary table. The bench surface should be 100% empty before you set up the storage system. Tools placed back on the surface during setup re-introduce the problem you’re trying to fix.
Step 2: Identify daily-touch ferrous hand tools (for tier 1)
Walk through your typical project. Which tools do you touch every few minutes? Most workbench users have 8-15 such tools: a couple of screwdrivers, a small pair of pliers, a utility knife, a marking pencil, maybe a chisel or two. These are tier-1 candidates IF they’re ferrous metal (the magnetic strip needs metal to grip). For the broader ferrous-vs-non-ferrous distinction, see how to organize garage tools without pegboard.
Step 3: Mount the bench-edge magnetic strip
Mount horizontally along the back edge of the bench surface, where the bench meets the wall. Height: just above the bench surface (1-2 inches up the wall). This places tools at arm’s length — reach-and-grab without leaning.
Some users prefer to mount the strip vertically on the wall behind the bench, at chest height. Both work; horizontal at bench edge is the more space-efficient choice for most layouts.
Step 4: Identify weekly-touch tools (for tier 2)
The next tier of frequency: tools you touch every few projects but not every minute. Hammers, larger wrenches, tape measure, level, square, larger screwdrivers, drill (if you’re using it that week). 15-25 such tools is typical for a home workbench.
Step 5: Mount the pegboard backsplash
Mount a 2-to-4-foot pegboard panel on the wall directly behind the bench, with the bottom edge of the pegboard at 36 to 42 inches from the floor (just above the bench surface). Hooks at eye level (4.5 to 6 feet) hold the most-grabbed tools. For the broader tool-wall-setup method, see how to set up a tool wall in garage.
Step 6: Add lighting, drawers, and adjacent storage
Once tiers 1 and 2 are working, add: task lighting (LED strip under cabinets above the bench or clamp-on bench light), drawer organization for tools that don’t fit either tier, and adjacent supplies storage. For workbench-adjacent supplies and chemical organization, see the utility storage buying guide. For complete workshop setup beyond just the bench, see how to set up a garage workshop.
Tools and Products That Help
Two picks for the two-tier system:
For tier 1 (bench-edge magnetic): HMmagnets 24-inch Heavy-Duty Magnetic Tool Holder

A 24-inch magnetic strip mounted at the back edge of the bench creates ultra-dense storage for the small ferrous hand tools you touch hourly. Only works for ferrous metal tools; plastic-grip-only tools don’t grip.
For tier 2 (backsplash pegboard): Wall Control 4 ft. Metal Pegboard Standard Tool Storage Kit

Galvanized metal pegboard accepts both Wall Control’s slotted hooks and standard 1/4-inch pegboard hooks. The 4-foot kit fits the typical workbench backsplash. Mount into wall studs (drywall anchors don’t hold loaded pegboard over time).
Common Mistakes
- Filling the bench surface with “tools I’m using now”. The pile grows. Six months later the bench is a tool depot, not a work surface. The fix: anything you’re “using now” goes on the magnetic strip OR the pegboard, never on the bench surface itself.
- Mounting magnetic strip too high or too far back. A strip 6 inches above the bench surface, 4 inches from the back wall, is unreachable when leaning over a project. Mount low (1-2 inches above bench) and close to the wall (flush or 1 inch out).
- Cheap pegboard that sags under weekly tools. MDF or hardboard pegboard sags within a year under loaded use. Use metal pegboard if you’ll be hanging tools heavier than a few hand tools.
- No task lighting. Every tool looks the same in poor light. Add a task light at the bench — LED strip, clamp-on, or under-cabinet — before the storage system can really work.
- Drawer organization without sorting first. Putting all tools into a drawer with no dividers creates “drawer pile”. Use drawer dividers or trays, and store like-with-like.
What garage wall systems actually hold, compared fairly
Pegboard is rated per panel, rails per linear foot, slatwall per square foot. Three different units means the published numbers cannot be compared as they stand — so nobody compares them, and a 200 lb figure on one product looks like a 200 lb figure on another. This table quotes each manufacturer’s rating and converts them all to pounds per linear foot of a 4 ft high wall run, with the arithmetic shown. Normalised values are comparison figures, not safe point-load limits. A system rated for 1,200 lb distributed across a wall section does not support a 1,200 lb hook.
| System | Type | Rating as published | Rating type | Same rating, per linear foot of a 4 ft wall | Working | Stud requirement | Specification source | Source checked |
|---|---|---|---|---|---|---|---|---|
| Wall Control metal pegboard (16 × 32 in panel) | pegboard | 200 lb per panel into studs (100 lb on drywall anchors) | panel recommendation | 225 lb per linear foot | 200 lb ÷ (16 in × 32 in panel = 3.56 sq ft) = 56.25 lb per sq ft; 56.25 × 4 ft high = 225 lb per linear foot (equivalently: a 4 ft × 4 ft section fits 3 panels across × 1.5 high = 4.5 panels × 200 lb = 900 lb ÷ 4 ft) | mounting holes on 16 in stud centres | Wall Control 16 × 32 in Metal Pegboard | 2026-09-14 |
| Gladiator GearTrack channel (rail) | rail | 75 lb per linear foot of channel | rail/channel rating | 150 lb per linear foot | 75 lb/ft per channel (published) × 2 channels (assumed common install) | mounts to bare wood studs or drywall over wood studs | Gladiator 4′ GearTrack Channels | 2026-09-14 |
| Gladiator GearWall slatwall panel | slatwall | 50 lb per square foot | distributed panel load | 200 lb per linear foot | 50 lb/sq ft × 4 ft high | not published on the product page | Gladiator 4′ GearWall Panels | 2026-09-14 |
How these numbers were produced: Each published rating is quoted from the manufacturer’s own page on the date shown. Conversion to pounds per linear foot assumes a 4 ft high run of wall: a per-square-foot rating is multiplied by 4. A per-panel rating is first converted to an equivalent per-square-foot rate, using the panel’s own published width and height, then multiplied by 4 the same way — scaling a per-panel rating sideways only, at the panel’s own height, would normalise it to a taller or shorter slice of wall than the 4 ft reference every per-square-foot row uses, so the two steps (per-panel → per-sq-ft → per-4-ft-run) keep every row on the same footing. A per-foot-of-rail rating is different in kind: the manufacturer publishes a rate per channel, and this table doubles it to show a common two-channel install — that doubling is our own installation assumption, not a manufacturer-stated rate; the sourced figure is the single-channel rate. Where a manufacturer publishes a single fixed capacity for a whole pre-sized unit rather than a rate per foot or per square foot, that figure is quoted as published and left out of the per-linear-foot column rather than converted with an invented rate.
- These are manufacturer maximums for a correctly installed system, not a promise. Every one of them depends on hitting studs, using the specified fasteners, and spreading the load rather than hanging it all off one hook.
- The comparison assumes a 4 ft high run. A rail system does not gain capacity from wall height the way a panel does — it gains it from adding channels, which is why its normalised figure moves when you change the channel count, not the height.
- Stud spacing is a hard constraint, not a suggestion. Proslat’s PROCORE is the only system here with a published compatibility range — engineered for 24 in centres, rated compatible down to 16 in. Check whether your own system publishes a similar range before assuming it.
- Drywall anchors are not studs: Wall Control publishes 100 lb per panel on anchors against 200 lb into studs — a real number for that one product, not a ratio to assume for other systems here that don’t publish their own stud-vs-anchor split.
- Capacity drops the further a load sits from the wall: storeWALL publishes 250 lb per sq ft as a distributed rating at the panel surface, but only 115 lb as a point measurement 4 in out. That lever-arm principle is a reasonable general caution for hooks and brackets on any system, but storeWALL is the only brand here that publishes a number for it.
- A blank cell means the manufacturer does not publish that figure — we do not fill gaps with numbers we could not source.
- This list favors brands whose own specification pages state a capacity figure in a form we could verify directly. Some well-known brands are not yet in this table because their published pages did not state a load rating we could confirm on this pass — that is a sourcing gap, not a signal that the product is weaker.
These are the entries that matter for this guide. The full table, with every row and its source, is in our What garage wall systems actually hold, compared fairly.
FAQ
What height should the bench-edge magnetic strip be at?
1-2 inches above the bench surface, mounted horizontally on the back wall. This places tools at arm’s-length reach without requiring you to lean over the bench. Higher is harder to grab; lower interferes with the bench surface itself.
Pegboard or slatwall for the backsplash?
Pegboard is the typical workbench-backsplash choice — cheaper per square foot, and the workbench tool collection rarely changes enough to justify slatwall’s modularity premium. If your tool collection turns over often (active hobbyist), slatwall is the better choice.
Do I need a drawer system too?
Not for the two-tier system to work. Drawers are useful for tools that fit neither tier 1 nor tier 2 — usually larger or specialized tools (drill bits collection, sandpaper, specific accessories). Add drawers after the two tiers are operational.
How wide a workbench fits the two-tier system?
Any width over 4 feet works. The pegboard backsplash needs at least 3 feet of clean wall width above the bench; the magnetic strip needs at least 12 inches of horizontal bench-back space. For benches under 4 feet wide, scale down (smaller pegboard panel, shorter magnetic strip).
What tools should never go on the magnetic strip?
Plastic-grip-only tools (the magnet has nothing to grip), aluminum tools, anything precision-calibrated that magnetic fields could affect (digital calipers, precision micrometers). Also nothing heavy enough to exceed the strip’s manufacturer-listed capacity — a 5-lb steel mallet on a strip listed at 20 lb total leaves only 15 lb of capacity for everything else.
Sources Reviewed
For this guide, we reviewed manufacturer documentation for magnetic tool holders and pegboard kits, workbench ergonomics references, and recurring patterns in public discussions about workbench organization.