How to Set Up a Garage Workshop: A 7-Step Practical Guide
Disclosure: This article contains affiliate links. If you buy through these links, we may earn a commission at no extra cost to you. We do not claim hands-on testing unless clearly stated.
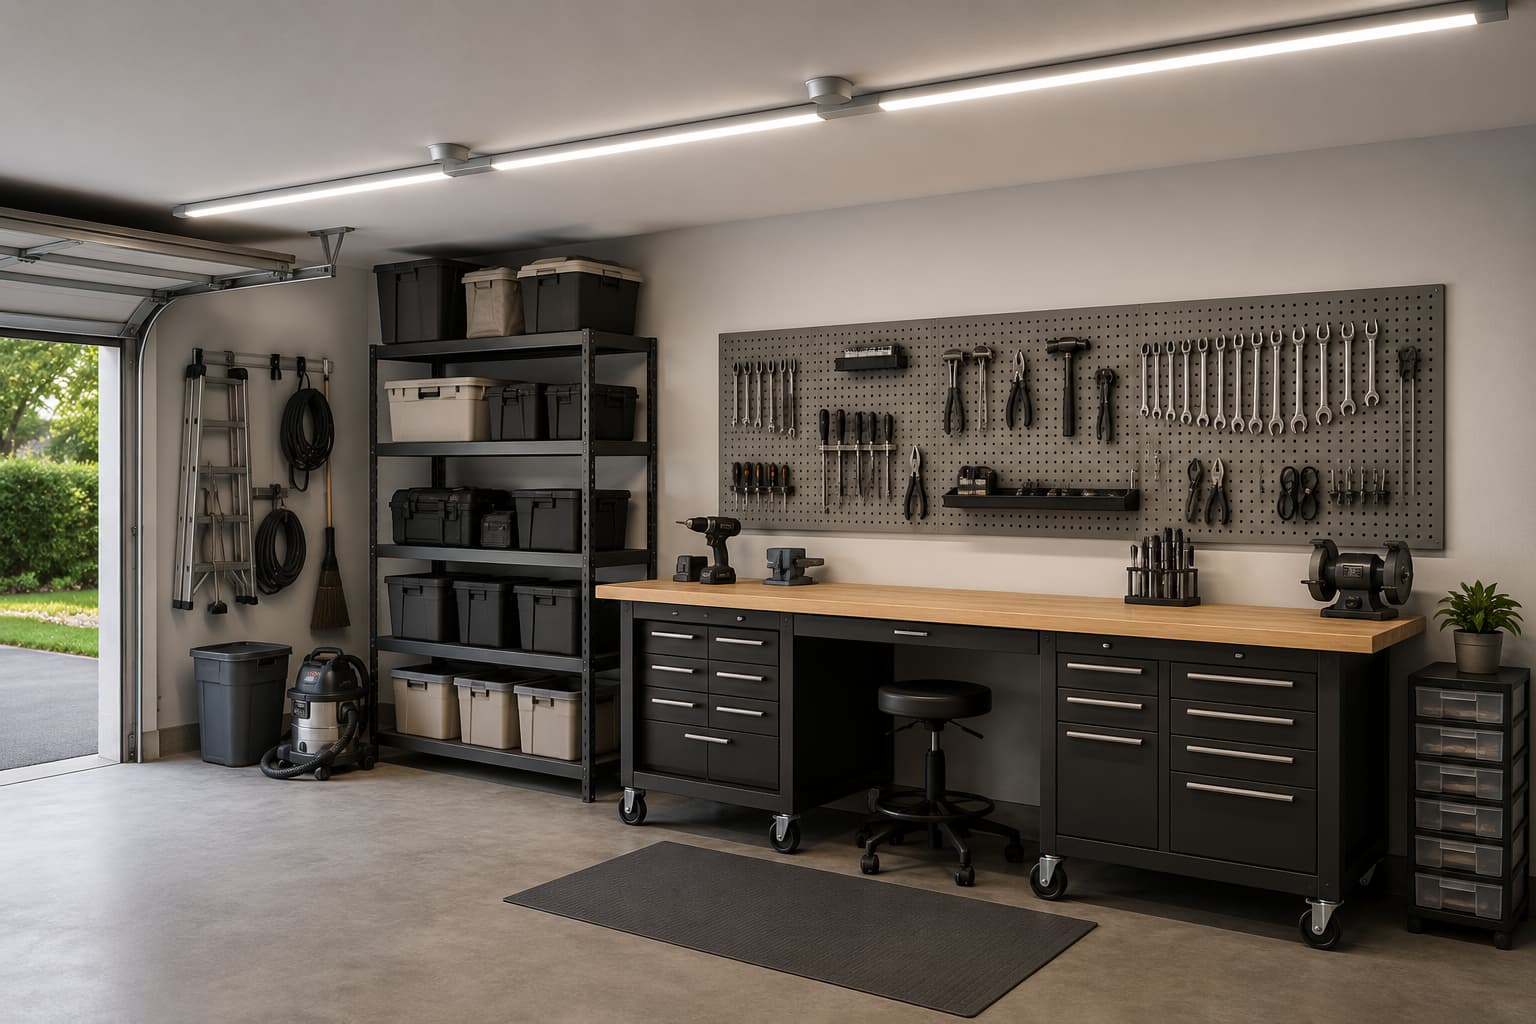
Most garage workshops fail not because the owner picked the wrong tools, but because they bought things in the wrong order. The cabinet arrives before the bench is placed. Pegboard goes on the wrong wall. Lighting becomes an afterthought. This guide lays out a 7-step sequence — from empty floor to working bench — that avoids those traps and flags the four mistakes that cause most rework. It does not cover electrical work beyond plug-in fixtures or permanent built-in cabinetry.
Before You Buy Anything: Plan the Layout
The single most useful step costs nothing. Before you order a bench or hang a pegboard, walk into your garage with a tape measure and make four decisions.
1. Where do the door clearance lines fall? Open both car doors fully and mark the floor where each one swings. Mark the arc the garage door follows. These zones cannot hold storage. Most workshop rework happens because storage was placed inside a swing line the owner forgot about.
2. Which wall gets the workbench? Locate the studs in each candidate wall. Pegboard, slatwall, and heavy shelving all need stud-mounted hardware — drywall anchors are not sufficient for cyclic loads.
3. Where are the existing power outlets? A workbench needs at least two nearby outlets within cord reach. Plan around what is already there rather than promising yourself you will rewire later.
4. Where does natural light come in? A window or a partially translucent garage door changes which wall is best for fine work. Don’t put the bench in the darkest corner.
If your footprint is unusually tight, our guide to setting up a small workshop area goes deeper on laying out a workshop in under 200 square feet.
The 7-Step Setup Sequence
Each step in this order exists because the next one depends on it. Skipping or rearranging is the most common reason a workshop ends up cluttered.
Step 1 — Clear the Floor
Empty the garage of anything not staying. Sort what’s left into keep, donate, and trash before new storage arrives. New storage installed around existing clutter just hides the problem. Floor space is the most valuable real estate in a workshop.
Step 2 — Add Task Lighting
Lighting comes second, not last, because every later step involves assembly. The default garage fixture is fine for parking and useless for fine work. Linkable 4-foot LED shop lights are the practical default: they plug into a standard outlet, link end-to-end so multiple fixtures share one cord, and produce daylight-temperature light that makes measurements readable. The Barrina LED Shop Light 4FT 6-Pack[/amazon link] is one widely-available option; the manufacturer lists 40W per fixture at 5000K. Mount them above the planned bench and the walking aisle.
Step 3 — Place the Workbench
The workbench is the third decision because everything else gets organized around it. The most important variable is depth, not width — you can extend along the wall later by adding a second unit, but you can’t extend depth without replacing the whole bench. A standard 24-inch depth handles most hobbyist work; specialty work may benefit from 28-30 inches.
Mobility matters more than first-time buyers expect. A bench on locking casters lets you roll it out for sanding or pull it under better light. The Craftsman 41-Inch 6-Drawer Mobile Workbench[/amazon link] is one typical starter option in this category: 41 inches fits a 1- or 2-car garage without dominating the floor, the removable solid wood top is sealed for easy cleanup, and the manufacturer lists the drawer slides at 100 lb each — enough headroom for a starter hand-tool collection. The 5-by-2-inch casters lock so the bench stays put when you’re working.
For deeper trade-offs, see our roundup of garage workbenches with storage.
Step 4 — Set Up Vertical Tool Storage
The wall behind the bench is the most underused real estate in most garages. Pegboard or slatwall gets daily-use hand tools off the bench surface and onto a wall where they’re visible. Pegboard uses hooks that drop into round holes; slatwall uses brackets that slide along grooves. Pegboard is cheaper and more widely compatible.
For pegboard, metal panels are more rigid than hardboard and accept both proprietary and generic 1/4-inch hooks. The Wall Control Pegboard Standard Tool Storage Kit[/amazon link] covers a 4-foot wall section. The manufacturer describes the Wall Control system as more than 10 times stronger than conventional pegboard, with a flush-to-wall mounting flange designed for stud-mounted installation.
Mount into studs. Drywall anchors fail under cyclic load.
Step 5 — Add Cabinets for Closed Storage
Pegboard is for tools you grab daily. Cabinets are for everything else — paints, solvents, fasteners, items you don’t want kids accessing. Wall-mounted cabinets keep the floor clear in tight garages; floor-stand cabinets hold more weight.
For the deeper buying decision, see how to choose garage cabinets. For specific picks in a small footprint, see best garage cabinets for small garages.
Step 6 — Power and Outlets
Stay conservative. If you don’t already have enough outlets within reach of the bench, the answer isn’t running extension cords across the floor — that’s a trip hazard. Call an electrician for permanent additions. For what you can do yourself: a multi-outlet power strip with surge protection mounted under the bench, plus a retractable cord reel mounted in a corner.
Step 7 — Organize the Bench Surface Itself
The bench top is the last thing you set up because what belongs on it depends on the six steps before. Keep it clear of permanent clutter. Reserve the surface for active work and for the small set of tools you reach for every project. For a per-zone breakdown of how to lay out the bench surface itself, see how to organize a garage workbench.
Common Mistakes
These four mistakes account for most of the regret messages first-time workshop builders post in online forums. None of them are about buying the wrong product — they’re all about doing things in the wrong order or skipping a step.
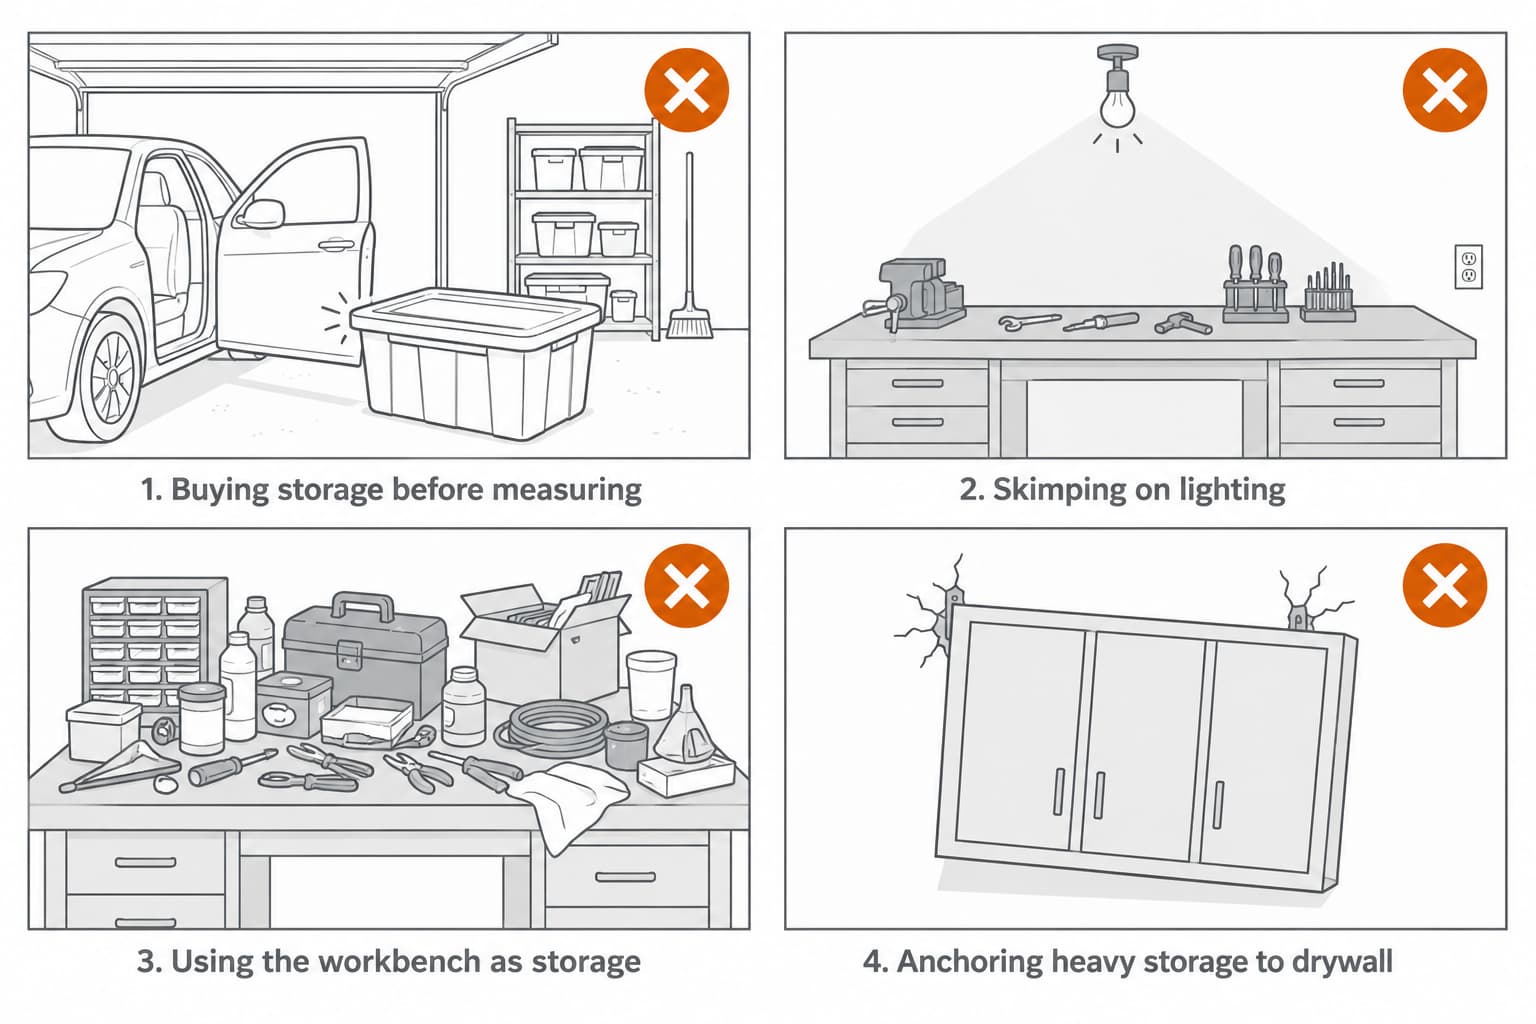
Mistake 1 — Buying Storage Before Measuring
What it looks like: Ordering a 6-foot rolling cabinet that arrives two inches deeper than the gap between the wall and the parked car. Or buying totes that overhang an 18-inch shelf by two inches.
Why it’s a problem: Returns cost shipping; restocking the wrong size costs time and momentum. The mistake compounds when the next purchase also misses the dimension.
What to do instead: Take measurements before ordering, write them in your phone, and confirm listed dimensions before clicking buy. Pay particular attention to depth — it’s the dimension product photos hide.
Mistake 2 — Skimping on Lighting
What it looks like: The default garage fixture stays, you tell yourself it’s “good enough”, and the first night project ends in eyestrain.
Why it’s a problem: Bad lighting doesn’t just make work slower — it makes it less accurate. Measurements get misread; tool angles get misjudged.
What to do instead: Plan lighting in Step 2, not Step 7. Linkable LED shop lights are inexpensive and plug-and-play.
Mistake 3 — Treating the Workbench as a Storage Surface
What it looks like: Every flat surface gets piled with parts, packaging, and half-finished projects. After a month, the bench has no working area left.
Why it’s a problem: A workbench full of stuff is not a workbench. Every project starts with 10 minutes of clearing the surface.
What to do instead: Build the storage to hold the stuff. Pegboard for daily tools, cabinets for chemicals, drawers for hand tools. The bench surface is the work zone.
Mistake 4 — Anchoring Heavy Storage to Drywall
What it looks like: A wall cabinet hung with plastic drywall anchors. It holds for a few months, then starts to tilt, then the anchors pull through.
Why it’s a problem: This is a safety issue, not just an inconvenience. A loaded cabinet falling from a wall can land on you or your car.
What to do instead: Find the studs. Use the mounting hardware specified by the manufacturer. If you can’t hit a stud where you want the cabinet, move the cabinet.
FAQ
How much space do I need to set up a garage workshop?
A functional starter workshop fits in 60 to 80 square feet — enough for a 4- to 6-foot bench against a wall plus pegboard above. A comfortable setup with closed storage wants 120 to 150 square feet.
Can I set up a workshop in a one-car garage?
Yes, but the choices are tighter. A mobile workbench you can roll out for projects and tuck against the wall when parking is essential. Vertical storage matters more.
Do I need to insulate or heat my garage workshop?
Not to start. Most hobbyist work happens fine in an uninsulated garage during three seasons in most US climates. Insulation and heat become priorities for finishing work that needs stable temperature, or in climates where winter routinely goes below 30°F.
What about the garage floor?
For a starter workshop, bare concrete is fine. Anti-fatigue rubber mats in the bench work area solve the comfort problem cheaply. Epoxy coatings are a Phase-2 upgrade.
What’s the minimum tool set to start a workshop?
Hand tools first: hammer, screwdriver set, adjustable wrench, locking pliers, tape measure, utility knife, level. Then a cordless drill/driver. Buying tools for projects you might someday do is how garages fill up with unused tools.
Should I bolt my workbench to the floor?
Generally no — bolting limits reconfiguration. A mobile bench with locking casters gives the best of both: stable when locked, movable when you want to reach the wall behind it.
Sources Reviewed
We reviewed manufacturer product pages and current Amazon listings for the anchor products referenced in this guide. We did not test these products in our own garage. Specifications change frequently — verify the current listing before purchase.
- Amazon listing — Craftsman 41-Inch 6-Drawer Mobile Workbench (CMST82777RB)
- Amazon listing — Wall Control Pegboard Standard Tool Storage Kit
- Amazon listing — Barrina LED Shop Light 4FT 6-Pack
- Wall Control manufacturer page — system description and panel strength framing
- Craftsman manufacturer page — S2000 41-inch mobile workstation specifications (drawer slide capacity, caster size, warranty framing)
Related Guides
- Best Garage Workbenches with Storage — deeper roundup of workbench picks across budget tiers
- Best Garage Cabinets for Small Garages — specific cabinet picks when floor space is tight
- How to Choose Garage Cabinets — buying-decision walkthrough for cabinets
- How to Set Up a Garage Workshop Area — spatial focus on the workshop zone within a multi-use garage
- How to Organize a Garage Workbench — per-zone organization of the bench surface itself